Author Topic: Wisconsin Central - Heritage Division  (Read 148273 times)

0 Members and 1 Guest are viewing this topic.

MichaelWinicki

  • Crew
  • *
  • Posts: 2096
  • Respect: +335
Re: Wisconsin Central - Heritage Division
« Reply #345 on: April 17, 2013, 05:54:10 PM »
0
I'll tell ya W., you did a nice job on those poles...

I think poles, and actually stringing them takes the scene to the next level.

PAL_Houston

  • Crew
  • *
  • Posts: 823
  • Gender: Male
  • Respect: +17
Re: Wisconsin Central - Heritage Division
« Reply #346 on: April 18, 2013, 09:55:44 PM »
0
Here is a picture of a bad picture of the iconic freight station in Waupaca:


...


Meh...

Nice job on the Waupaca freight station!  Maybe you can color the brick while you watch the Brewers play baseball this season?  :D

This is the first time I noticed your fascia, and I think I did because it is textured.  It looks kind of cool to me, like it could've been an old wall or something.  Please tell us about that, too?
Regards,
Paul

Dave Schneider

  • Crew
  • *
  • Posts: 2377
  • Respect: +51
Re: Wisconsin Central - Heritage Division
« Reply #347 on: April 18, 2013, 11:37:18 PM »
0
With a brick building, you might consider flipping the windows and installing them from the inside so that there isn't as much or any wooden trim on the outside. The freight doors could be liberated from its trim and inset into the brick opening. Maybe too late for this model, but maybe next time.

Best wishes, Dave
If you lend someone $20, and never see that person again, it was probably worth it.

w neal

  • Crew
  • *
  • Posts: 1434
  • Respect: +483
Re: Wisconsin Central - Heritage Division
« Reply #348 on: April 19, 2013, 08:00:56 AM »
0
Great point Dave. Dang, now I want to rip it out & redo. Actually, the frames help cover up the really awful holes I cut in the brickwork.

The fascia?, jeesh, nothing I really want to discuss.  :facepalm: I think the fascia helps distract from my less than perfect modeling!  :)
« Last Edit: April 22, 2013, 09:26:09 AM by w neal »
Buffering...

Rabidchipmoose

  • Crew
  • *
  • Posts: 26
  • Respect: 0
Re: Wisconsin Central - Heritage Division
« Reply #349 on: April 19, 2013, 01:18:44 PM »
0
Here is a picture of a bad picture of the iconic freight station in Waupaca:


Here is my attempt, for now. I could not locate the correct overhead doors, so I used a couple stand-ins. Who knows, they might have orginally looked like this anyway and will look better for "retro nights". I probably will not attempt to color the individual bricks, as per prototype, because I have a life. I will go back and add some of the hailrails and other details however.


Meh...

This really makes me miss being a part of the project.  Nice work!

w neal

  • Crew
  • *
  • Posts: 1434
  • Respect: +483
Re: Wisconsin Central - Heritage Division
« Reply #350 on: April 23, 2013, 07:27:56 AM »
0
Its time to model the Tower Road crossing:


First, I cut a piece of styrene at about 26 scale feet wide. I put some marks on the back to help me rememeber it's orientation as to the tracks.
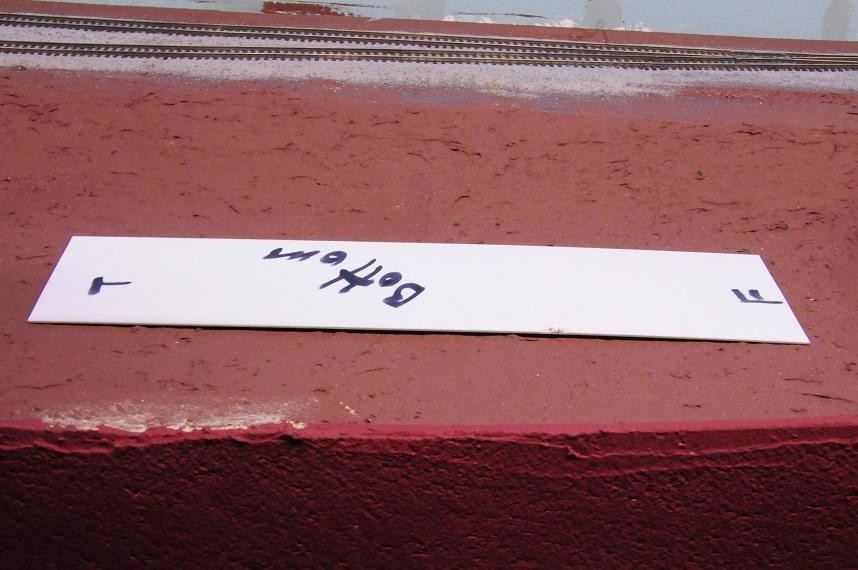


Then I placed it on the layout, after cutting away the portions that would cover over the tracks.


Then I trimmed off what is needed to allow room for the BMLA "rubber" crossings.


Using the left over bits of styrene road, I trimmed a piece to place on the opposite side of the crossing. I gave this second piece a bend to represent a hill. This was done to help hide the dissappearance of the road into the backdrop. Here, it is seen upside down.


Here is another view right side up after painting. I selected a light shade of grey from a rattle can as my cover. Luckily, the weather was warm and sunny allowing for quicker drying time outside.


Note here, other than my dry fingers, the height of the rail above the roadway. This is a purely subjective decision. For me, I want to leave a bit of "cheat room" for when I will be cleaning the tracks. That is to say, I want to leave some room for whatever cleaning device or touch pad will be actually touching the rails. I want the cleaner to have a little room so as not to contact, and therefore scrape, the roadway with each pass. This will not be satisfactory for some I realize. The BLMA "rubber" crossings will most likely be closer to the actual railhead. (We'll see. Bit of an experiment here.)

Also you'll notice a piece of styrene here under the roadway.


I used a couple different sizes here. You'll note how I used stock of different widths. I do this so that I get a choice of heights during the same installations. Different circumstances call for different heights. Its nice to have a choice right there in front of you at the time.


Anyways, I glue the styrene right to the cork roadbed taking careful note of the projected road height. Note that the roadway is not yet glued down in the above picture. I am just sizing up the fit first.

Here is the shim glued down. I pretty much glue the shim right up next to the tie ends. As always, test your fit first.


Here I am test fitting again. Note that the road is not actually glued down yet, hence the non-levelness (is that a word?).


Make sure to leave room for the BLMA crossing. Yes, I see the gap between the rails and the crossing. The track is curved a bit here. Strangely, I do not care however as the crossing will be viewed at a low angle most of the time. If the track were straight, I'd want to eliminate any such gap.


Now its time to glue the road down. I pulled up the road to show you something. Whatever glue you use, (hopefully it is somewhat thick), some of this stringy-ness is actually desirable for me. These strings tend to dry in a hardened way for me. They lend support therefore for unsupported parts of the roadway. It may look gross, but they will help you.


So anyways, once again, watch your spacing of things before the glue/adhesive sets up. You may have only seconds until this happens, so don't delay. Keep checking and rechecking.


While the glue is setting up, feel free to press down on it to help create these strings.


I secured the front of the roadway to the shim with plastic cement.


Oh, I decided to support the "rear" roadway with some additional styrene...


Before securing the back roadway, again, check the spacing.


With the roadway secured, its muddin' time. Just like putting numberboard decals in a locomotive, muddin' around an existing roadway will test your dexterity. The end results seem to be worth it however.


At this point I will rest for a day to let the groud goop (or mud) dry.


More later next week...
« Last Edit: April 26, 2013, 06:35:52 AM by w neal »
Buffering...

Bsklarski

  • Crew
  • *
  • Posts: 673
  • Gender: Male
  • Respect: +6
    • B&M Conn River Line
Re: Wisconsin Central - Heritage Division
« Reply #351 on: April 23, 2013, 11:20:59 AM »
0
I would sand it to match the curve. You will kick yourself later if you dont. I know this, dont ask how lol.  :|
Brian Sklarski
Engineer, New England Central Railroad

https://www.facebook.com/pages/Boston-Maine-Conn-River-Line/173358446076160

w neal

  • Crew
  • *
  • Posts: 1434
  • Respect: +483
Re: Wisconsin Central - Heritage Division
« Reply #352 on: April 23, 2013, 11:34:23 AM »
0
Brian,

"Yes, I see the gap between the rails and the crossing. The track is curved a bit here. Strangely, I do not care however as the crossing will be viewed at a low angle most of the time. If the track were straight, I'd want to eliminate any such gap..."

I agree with you for certain. Take a look at the last picture above. I think you'll see why I can live with the gap.  ;)
« Last Edit: April 23, 2013, 12:24:47 PM by w neal »
Buffering...

Philip H

  • Crew
  • *
  • Posts: 9023
  • Gender: Male
  • Respect: +1791
    • Layout Progress Blog
Re: Wisconsin Central - Heritage Division
« Reply #353 on: April 23, 2013, 12:28:03 PM »
0
I like this crossing.  your techniques with the various components are answering some questions for me about how I might do a couple of theses on my layout.  Thanks!
Philip H.
Chief Everything Officer
Baton Rouge Southern RR - Mount Rainier Division.


Bsklarski

  • Crew
  • *
  • Posts: 673
  • Gender: Male
  • Respect: +6
    • B&M Conn River Line
Re: Wisconsin Central - Heritage Division
« Reply #354 on: April 23, 2013, 12:51:01 PM »
0
Looks to be a good 2 feet or so from the eyes. I would guess once you paint and weather the whole thing, any shadows from spaces will disappear and it should be good.
Brian Sklarski
Engineer, New England Central Railroad

https://www.facebook.com/pages/Boston-Maine-Conn-River-Line/173358446076160

mcjaco

  • Crew
  • *
  • Posts: 1754
  • Respect: +147
Re: Wisconsin Central - Heritage Division
« Reply #355 on: April 23, 2013, 01:20:53 PM »
0
Paint the side of the rails at that part black, so it blends in when looking at it, and be done with it.  If someone is peeking at that grade crossing that closely, they probably need a kick in the shin.
~ Matt

Modutrak.com

JSL

  • Crew
  • *
  • Posts: 439
  • Gender: Male
  • In the Heart Of BNSF Country
  • Respect: +4
    • In the Heart Of BNSF Country
Re: Wisconsin Central - Heritage Division
« Reply #356 on: April 23, 2013, 01:58:01 PM »
0
As was said earlier, this is a great post as the techniques will come in handy when I get to the road / crossing point. I wouldn't worry either once it painted and weathered it should blend nicely.

MichaelWinicki

  • Crew
  • *
  • Posts: 2096
  • Respect: +335
Re: Wisconsin Central - Heritage Division
« Reply #357 on: April 23, 2013, 05:57:21 PM »
0
Great tutorial W.

w neal

  • Crew
  • *
  • Posts: 1434
  • Respect: +483
Re: Wisconsin Central - Heritage Division
« Reply #358 on: April 24, 2013, 06:14:43 AM »
0
Did a bit more mudding last night but not near the above crossing. Mud work would be rather boring for this blog, so I did not take any pictures. I'm still letting things dry around the roadway. Instead, I took time to finish this background industry (not rail served) in Neenah. Just a couple doors and paint. I plan to add some concrete steps at the fire exits, maybe something to represent the mercury vapor outdoor light fixtures, and something to represent roof vents etc. More scenery work to be done next to this structure as well. However shocking it may seem, this industry (from a trackside view) is very unremarkable in real life also.


I'll try to get back to the road crossing tonight.
Buffering...

Philip H

  • Crew
  • *
  • Posts: 9023
  • Gender: Male
  • Respect: +1791
    • Layout Progress Blog
Re: Wisconsin Central - Heritage Division
« Reply #359 on: April 24, 2013, 08:57:13 AM »
0
What have you thought about for the light fixtures?  And are you interested in static or actually lighting?
Philip H.
Chief Everything Officer
Baton Rouge Southern RR - Mount Rainier Division.