Author Topic: Turning down Faulhaber Gearheads  (Read 3545 times)

0 Members and 1 Guest are viewing this topic.

mmagliaro

  • Crew
  • *
  • Posts: 6489
  • Gender: Male
  • Respect: +2011
    • Maxcow Online
Turning down Faulhaber Gearheads
« on: December 28, 2018, 03:21:50 AM »
+4
This subject came up in the discussion about modifying gearheads to achieve different ratios (in the context of
mourning the passing of Eldon Shirey).

During the 0-6-0 project thread, I modified a 256:1 Faulhaber gearhead to get a 16:1 ratio by shortening the case and removing planetary stages.

Those photos are repeated here, and I'll try to insert some extra text to help them along.

First, a basic concept of these gearheads is that they all use stacked stages of planetary gears that each achieve a 4:1 reduction.  Therefore, the total reduction is always a multiple of 4.  For example, if you have only one stage, you get 4:1.  If you have two stages, you get 4x4 = 16:1.  If you have three stages, you get 4x4x4 = 64:1, and so on.  Why they settled on 4:1 for each stage, I am pretty sure, is really an arbitrary choice based on the limitations on the size of the gear teeth and bores, and choosing a reasonable compromise that would offer a good selection of ratios.

Also remember, I don't own a lathe.  I only own a mill.  So I did these cutting operations in the mill.  But in fact, everything I did was really a lathe operation, and it would be easier to do all of this if you have a lathe.

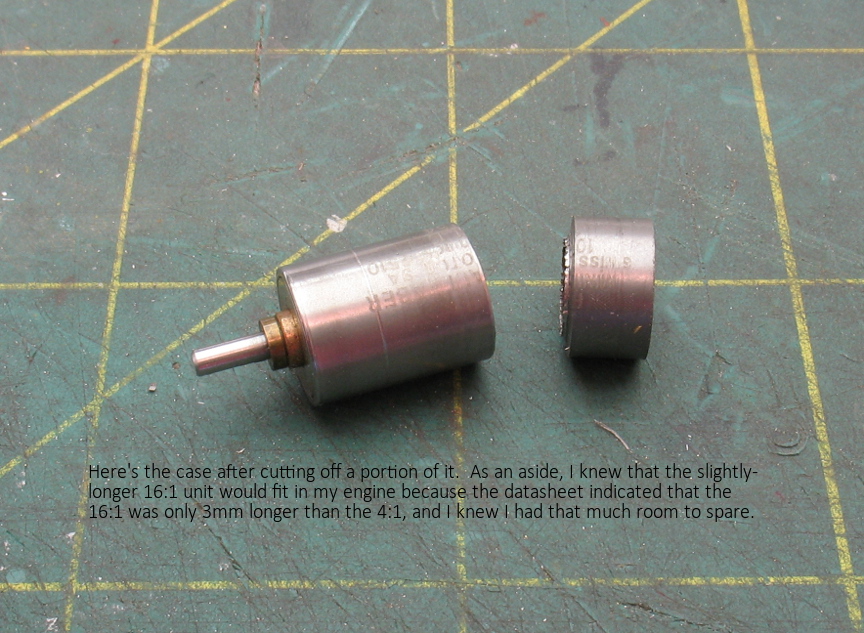
These gearheads all have an insert that is pressed into the back of the case.  We need to cut around the outside of the case just until we cut through the case, but NOT into the insert, and allow the insert to drop out.
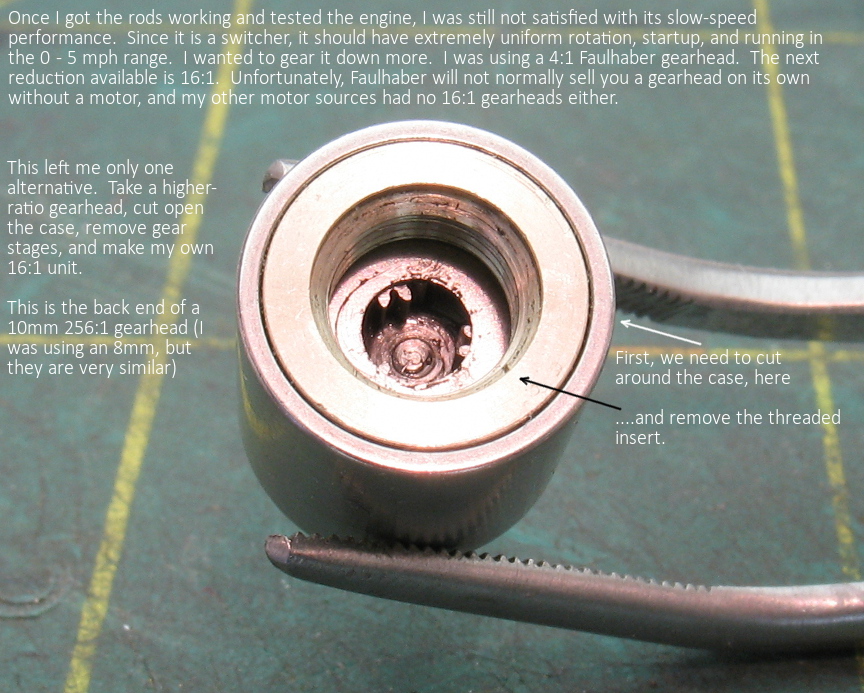


Once you cut through the case, the insert will drop out.  (The insert is the threaded ring at the bottom center of the next photo).  All the planetary gear stages will drop out as well.   It's a good idea to place a clean cup of some kind underneath as you cut through the case, because all these tiny parts will probably drop out into a mass of metal shavings under your chuck if you don't, and you will lose the little gears as well.   Even with the cup, you won't lose anything but you need to clean and brush out ALL of this with a soft brush and something like acetone until all the parts are clean, the way they appear in the next photo.


In this example, I was removing some gear stages to decrease the ratio from 256:1 to 4:1 (I wanted to remove 3 stages).
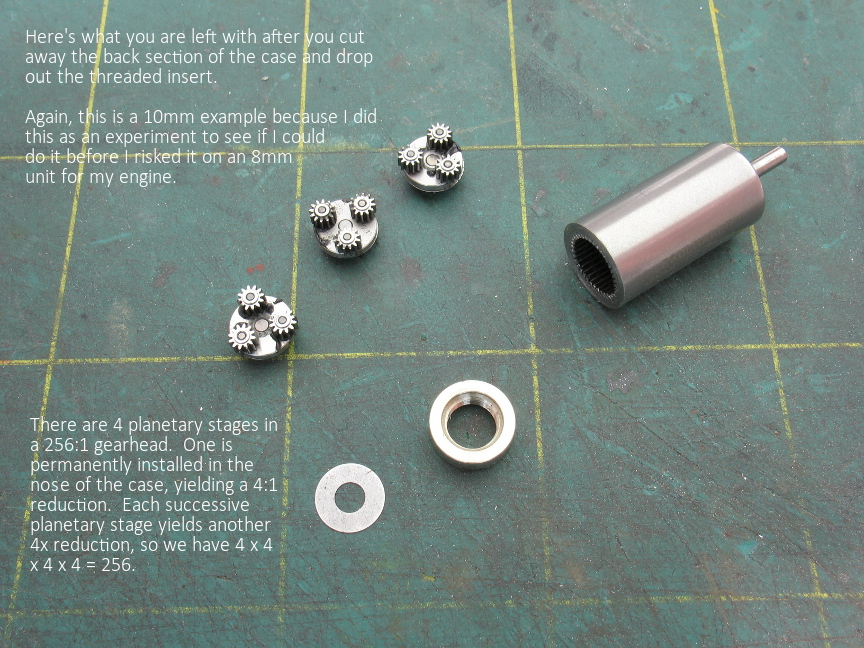
So the case must be shortened.  As indicated in the photo caption, they key here is to have a REALLY sharp, thin
cutter.  We are trying to "part off" a section of the case.  But there are gear teeth cast into the inside of the case, and as the cutter goes through, it will deform the edges of those teeth.  We need to minimize that damage.

Luckily, these cases are NOT stainless steel, like the gears themselves.  They are actually quite a soft steel and the cutter goes through them easily.
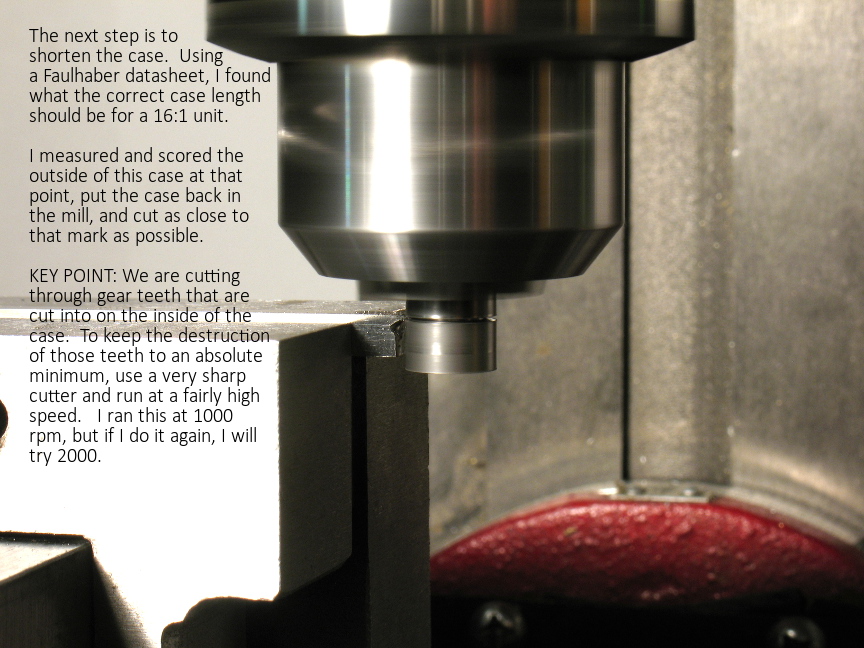


As you can see in the next photo, I really mangled the teeth at the back edge of the case.  This was only the first time I tried doing this.  On my next attempt, I sharpened my cutter better and ran the spindle at a higher speed, which worked quite a bit better.
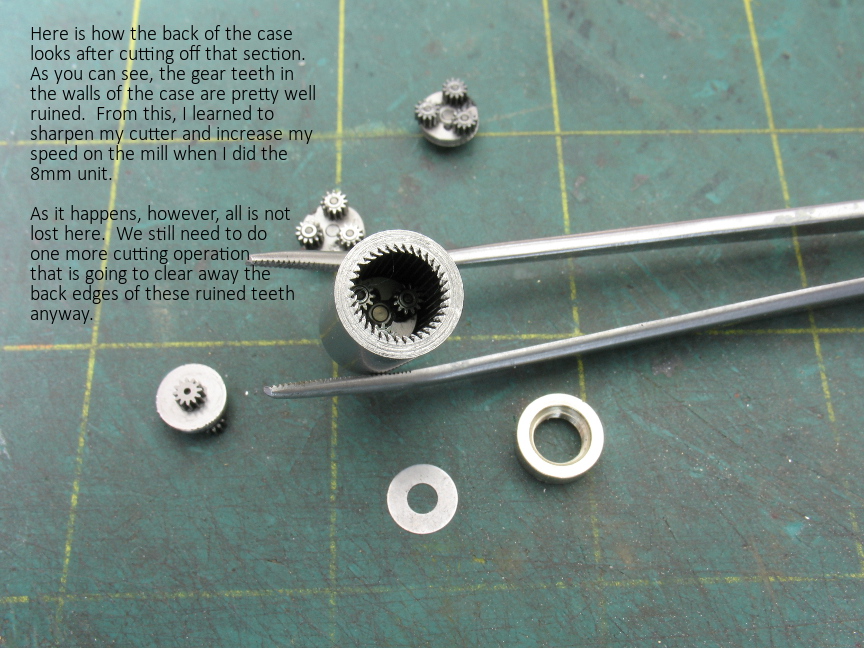


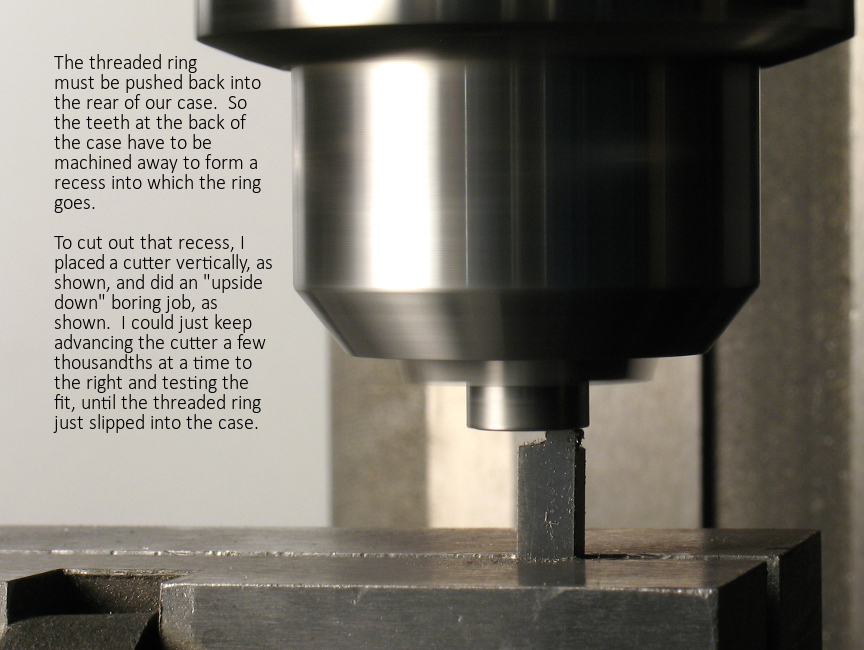
The case is now shortened.  But in order to press the rear insert back into it, we have to machine away a recess in the inside of the rear of the case (right where the ruined teeth are).  This is lucky, because it means those teeth I ruined won't matter - I'm going to cut them out of the way anyway.


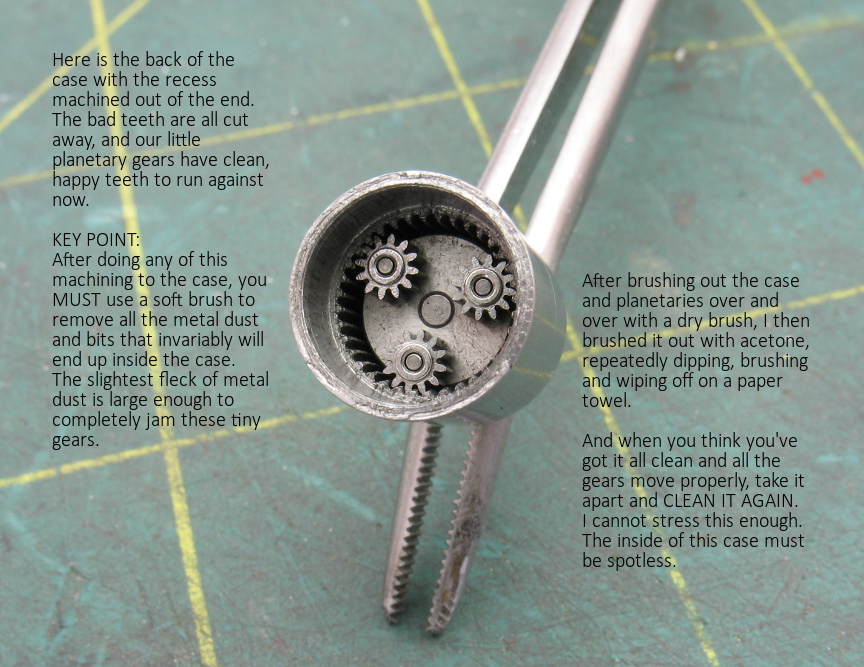
Here's the gearhead with the recess cut out of the rear, inside part of the case.  And once again, as the photo captions stress, you need to make the inside of this thing "hospital clean" before you try to reassemble everything.  These gears are unbelievably small, and any fleck of metal dust on a gear tooth will jam this thing up.


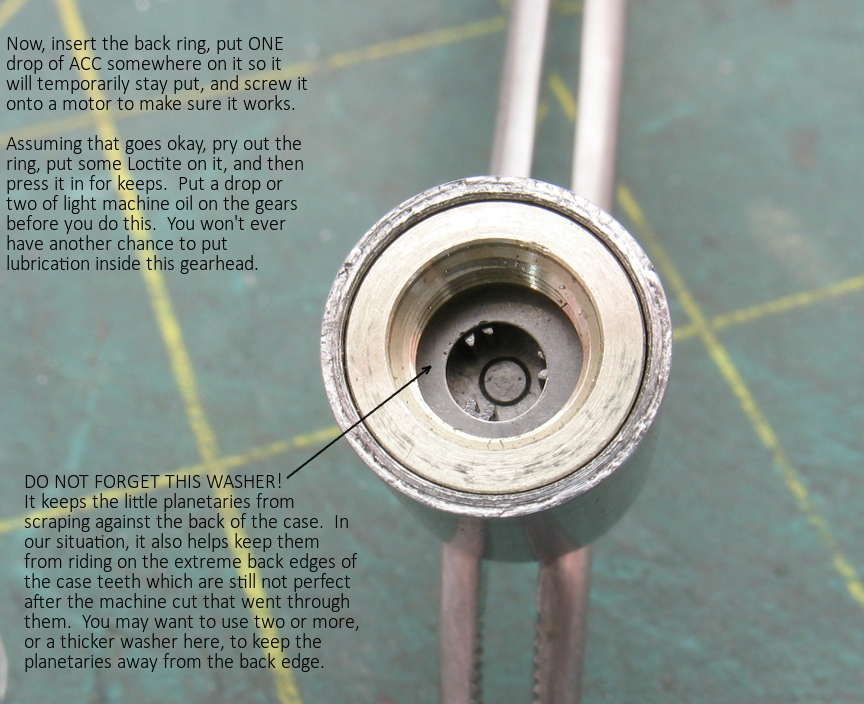
Now, the rear insert ring can be pushed back into the rear of the case to complete the job.
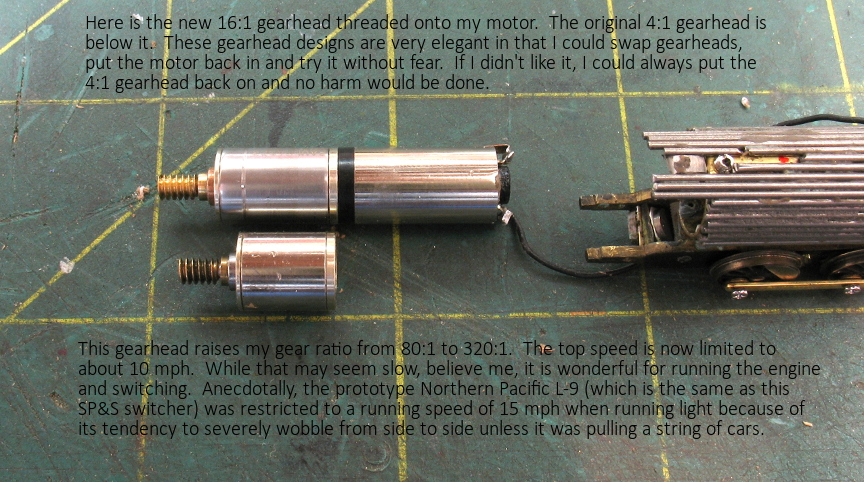
Somebody asked how these attach to the motors.  If you look at the next photo, you can see threads in the inside of that insert ring, down inside there near the washer at the bottom.  There is a threaded nose on the motors that simply screws into this hole.  It's all designed very elegantly so that when the gearhead is screwed all the way onto the motor, the motor pinion goes right down the center of the gearhead and engages the three planetary gears inside the gearhead.


Some more photos of completed gearheads.

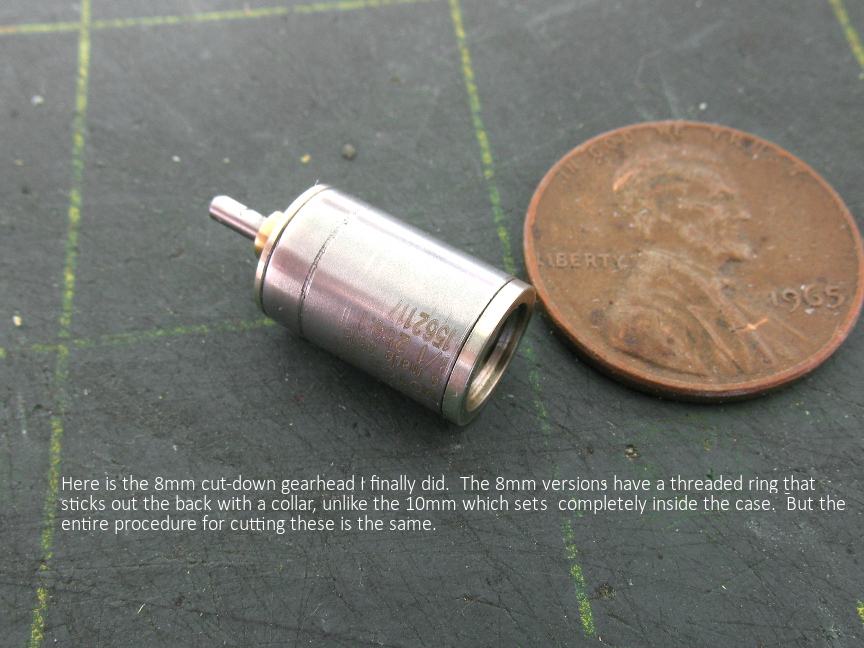
Here's the 8mm one I did for the 0-6-0:


The final photo shows the new gearhead screwed onto the motor:


--------------
Final thoughts.  If you have a lathe and you try this, you'll know right away if you've got it right.  If you can screw the gearhead onto the motor and turn the output shaft with your fingers, and it turns freely, you've got it right.  If it has a "rough spot" in the rotation ANYWHERE, unscrew it and see if you have any metal bits still down in the teeth.  If not, you probably have too much error somewhere in the lathe operations.  These things should always turn as smooth as glass, and if they don't, it really ruins the performance of the whole gearmotor.  About all you can do is "cheat" a little, by unscrewing the gearhead, perhaps 1/4 turn, and then 1/2 turn, etc, and see if the rough spot goes away.  You might be able to find a sweet spot where everything is smooth.  If you get lucky, you can add a washer or some shims, between the motor and gearhead, and then tighten the gearhead down again, and see if it all works.  This is not at all the desirable way to get it to work, but you might be able to "save" one that is botched a little.


« Last Edit: December 28, 2018, 03:27:38 AM by mmagliaro »

MK

  • Crew
  • *
  • Posts: 4351
  • Respect: +952
Re: Turning down Faulhaber Gearheads
« Reply #1 on: December 28, 2018, 10:17:18 AM »
0
Oh boy!  Here we go again....   :o :D 8) :lol: :trollface:

mike_lawyer

  • Crew
  • *
  • Posts: 820
  • Respect: +175
Re: Turning down Faulhaber Gearheads
« Reply #2 on: December 28, 2018, 10:55:27 AM »
0
Awesome info Max!  Thanks as always for your detailed photos and explanations!

Bryn

  • Crew
  • *
  • Posts: 127
  • Gender: Male
  • Respect: +460
Re: Turning down Faulhaber Gearheads
« Reply #3 on: January 09, 2019, 04:22:47 PM »
0
A very interesting read, thanks for sharing!

mike_lawyer

  • Crew
  • *
  • Posts: 820
  • Respect: +175
Re: Turning down Faulhaber Gearheads
« Reply #4 on: January 10, 2019, 10:17:34 AM »
0
Does anyone know of second hand or surplus suppliers of Faulhaber 1016s and 10/1 gearheads?  I know some of the retail places have astronomically high prices for new ones.

peteski

  • Crew
  • *
  • Posts: 35267
  • Gender: Male
  • Honorary Resident Curmudgeon
  • Respect: +6640
    • Coming (not so) soon...
Re: Turning down Faulhaber Gearheads
« Reply #5 on: January 10, 2019, 03:27:18 PM »
0
Does anyone know of second hand or surplus suppliers of Faulhaber 1016s and 10/1 gearheads?  I know some of the retail places have astronomically high prices for new ones.


That is the million-dollar question.  If we knew a source, we wouldn't be so crushed by the Motorman's passing.
. . . 42 . . .

mmagliaro

  • Crew
  • *
  • Posts: 6489
  • Gender: Male
  • Respect: +2011
    • Maxcow Online
Re: Turning down Faulhaber Gearheads
« Reply #6 on: January 10, 2019, 11:31:18 PM »
0
There are two sellers on eBay right now who have the 1016 for $30 - $35 (and I'm not counting microlocomotion, which was Eldon, and he is still listed on there).

But they have gearheads on them you can't use (1024:1 or something like that).  So you can get them, unscrew the gearhead, and now the fun begins... finding a 4:1 gearhead at a good price.  That's always the hard part.

There are also several sellers with 0816 (the 8mm size) for like, $8.  Again, you'll have to battle the pinion gear and gearhead to really use these.

And that's why I started learning how to cut down gearheads.  I feared this day was coming.

And honestly, I can't set myself up to do this.  The last time I did it, it took me a couple of hours just to do one, and I don't have anywhere near a 100% success rate.   I can get a good one to come out better than half the time, but I'm not good enough to do it "for hire".  If I had a few hundred lying around like Eldon did, I could practice my technique.   But alas, a box of 100 gearheads is not a likely thing to find.


narrowminded

  • Crew
  • *
  • Posts: 2305
  • Respect: +743
Re: Turning down Faulhaber Gearheads
« Reply #7 on: January 10, 2019, 11:59:12 PM »
0
@mmagliaro If somebody needs one now and could get Max to help choose the proper starter motor I could give one a try.  I see this being about a $25 proposition in short quantities.  The first few will take some time to get the tools, method, and gripping worked out.  I'll try one with a cost not to exceed $25 and may never do another one again. ;) :D 

I'm actually not worried about being able to do it but do fear that the effort will be more than it's worth.  But I should try one as it may prove to not be so bad. 8)

Edit add:  Boy that sounded negative when I re-read it. :facepalm:  Not meant that way.  If I was to guess, sight unseen but having a sense of the work from Max's description, I would put a cost range on this of $15- $25.  If you were doing a few identicals at once that could probably be measurably less.  Something like the mentioned numbers for the first one and maybe dropping $5 for the next one, maybe a $10 drop for the third one, and then flat from there on.  I can't imagine there being any real large quantities. :)  And I really should try one to see if this is a viable service that could be offered.  And again, I'm not worried at all about being able to do it but I am just a little worried about the time it will take.
« Last Edit: January 11, 2019, 03:06:14 AM by narrowminded »
Mark G.

narrowminded

  • Crew
  • *
  • Posts: 2305
  • Respect: +743
Re: Turning down Faulhaber Gearheads
« Reply #8 on: January 23, 2021, 08:07:47 AM »
0
I know this is old but it's the topic that has recently become very real for me. ;)  It seems that somebody is calling the bluff and wants to actually do one of these conversions. :)

Just a quick summary to make sure I understand, sight unseen, the intent and work involved. 

1)  The described procedure utilizes one assembly and when completed, yields one assembly, with all excess pieces becoming scrap or spares.  No concerted effort is expended to save any of those bits.  Correct?

2)  The purpose of turning the motor end is to relieve the tension of the press fit so that the gear case can be opened allowing ALL of the internals to be removed as well as necessary quantities being salvaged to be used as needed in the final assembly.  And, if you know, is that just a press fit or is there something like loctite used to retain that motor end cap? 

 3)  It appears that the opposite end, the output end, is pressed into the case as well but is not removed.  Is that correct?  And the line that appears slightly back from the output end in several pics is a tool mark, not evidence of a laser weld or anything.  Correct?

4)  On assembly, the planetary assembly aligns with the motor shaft by the threaded nose on the motor and the planetary assembly face engaging the motor face, nothing else.  Correct?

5)  Are there thrust washers in addition to that shown at the motor end of the assembly?  Maybe between each planetary stage or possibly just one additional at the output end?

Now, some musings.  If those understandings are correct, would there be any possibility of salvaging large enough segments of that case with the internal gear, to engage with the planetary gears salvaged from each stage, making additional assemblies?  I assume that would not leave sufficient length for the inside diameter alignment bores for the end caps but what if new end caps were machined to engage with the outside of the internal gear shell, just salvaging the difficult part to replicate.  This might allow for some additional units to be made from the scraps utilizing the truly complex inner working pieces that are so rare or costly by making the more straight forward pieces (although very precise), end caps and the thin thrust washer(s).  Maybe you couldn't salvage enough to utilize every salvaged stage but maybe enough for two or maybe just one extra? Just a thought. :|  While it would seem that this would require the external dimension to be oversized, and so be it, but maybe the OD of the shell could be reduced and the end cap walls thin enough to press over while maintaining the original OD. :|  I will have to see one to determine the feasibility of that. :)
« Last Edit: January 23, 2021, 08:44:06 AM by narrowminded »
Mark G.

mmagliaro

  • Crew
  • *
  • Posts: 6489
  • Gender: Male
  • Respect: +2011
    • Maxcow Online
Re: Turning down Faulhaber Gearheads
« Reply #9 on: January 23, 2021, 09:22:09 PM »
0
All your statements are correct.  As to one of your questions, the rear metal insert is indeed held in by some sort of adhesive.  It isn't just pressed in.  So by machining away the back of the case around that insert, you also get rid of the adhesive and it just comes out.

There are no thrust washers between stages in the gear case.  But there ARE usually some large, thin, flat washers over the back of the very last (rearmost) stage to keep the 3 little planetaries from wandering backward and rubbing on the rear of the case.

I suppose if you wanted to try to salvage the removed section of case and make another gearhead out of it, you could try, but that seems like an arduous amount of work.  I find it handy to save off the unused planetaries from those stages to use as pinions gears, because they are usually perfect matches and will go right on the Faulhaber motors.
« Last Edit: January 23, 2021, 09:55:35 PM by mmagliaro »

narrowminded

  • Crew
  • *
  • Posts: 2305
  • Respect: +743
Re: Turning down Faulhaber Gearheads
« Reply #10 on: January 24, 2021, 03:30:14 AM »
0
All your statements are correct.  As to one of your questions, the rear metal insert is indeed held in by some sort of adhesive.  It isn't just pressed in.  So by machining away the back of the case around that insert, you also get rid of the adhesive and it just comes out.

There are no thrust washers between stages in the gear case.  But there ARE usually some large, thin, flat washers over the back of the very last (rearmost) stage to keep the 3 little planetaries from wandering backward and rubbing on the rear of the case.

I suppose if you wanted to try to salvage the removed section of case and make another gearhead out of it, you could try, but that seems like an arduous amount of work.  I find it handy to save off the unused planetaries from those stages to use as pinions gears, because they are usually perfect matches and will go right on the Faulhaber motors.

Thank you, Max! 8)
Mark G.