Author Topic: Styrosplines  (Read 9010 times)

0 Members and 1 Guest are viewing this topic.

kelticsylk

  • Crew
  • *
  • Posts: 781
  • Respect: 0
    • Milepost 15
Styrosplines
« on: April 15, 2013, 12:31:33 AM »
0
A few guys here have asked that I start a thread about the unconventional roadbed I am using on my N scale Allegheny Eastern layout. I have written about it on my blog, but it was suggested it should also be shared here.

Not exactly sure where to start, but here goes...

The Allegheny Eastern goes through revisions more often than I change socks. I am constantly trying new ideas in design and construction. If I find one that seems to work very well I'll often redo the entire layout. I'm not above starting over from scratch if need be, though these days this happens less and less. The general design has crystallized. The last major changes are in process (famous last words).

I've tried some rather unorthodox ideas in planning and constructing the layout. One of the materials I've tried several times is extruded styrofoam. Through much trial and error I developed a construction method for roadbed I tend to call styrosplines. This is the construction I am currently using on the All East. Although I was using a plywood and foam lamination based on traditional "cookie cutter" construction. I found myself using and entirely different construction when revising a small section of the layout. It was this revision that caused me to rethink my approach and set me off in a new direction. I liked the results so much that I started rebuilding all the roadbed in the same fashion.

It's pretty simple and straightforward. Using a straight edge and a razor blade from a utility knife I cut 4' x 8' sheets of 1/2" thick styrofoam into 32 strips 1 1/12"thick. I cut along the sheet so the resulting "splines" are 96" long...


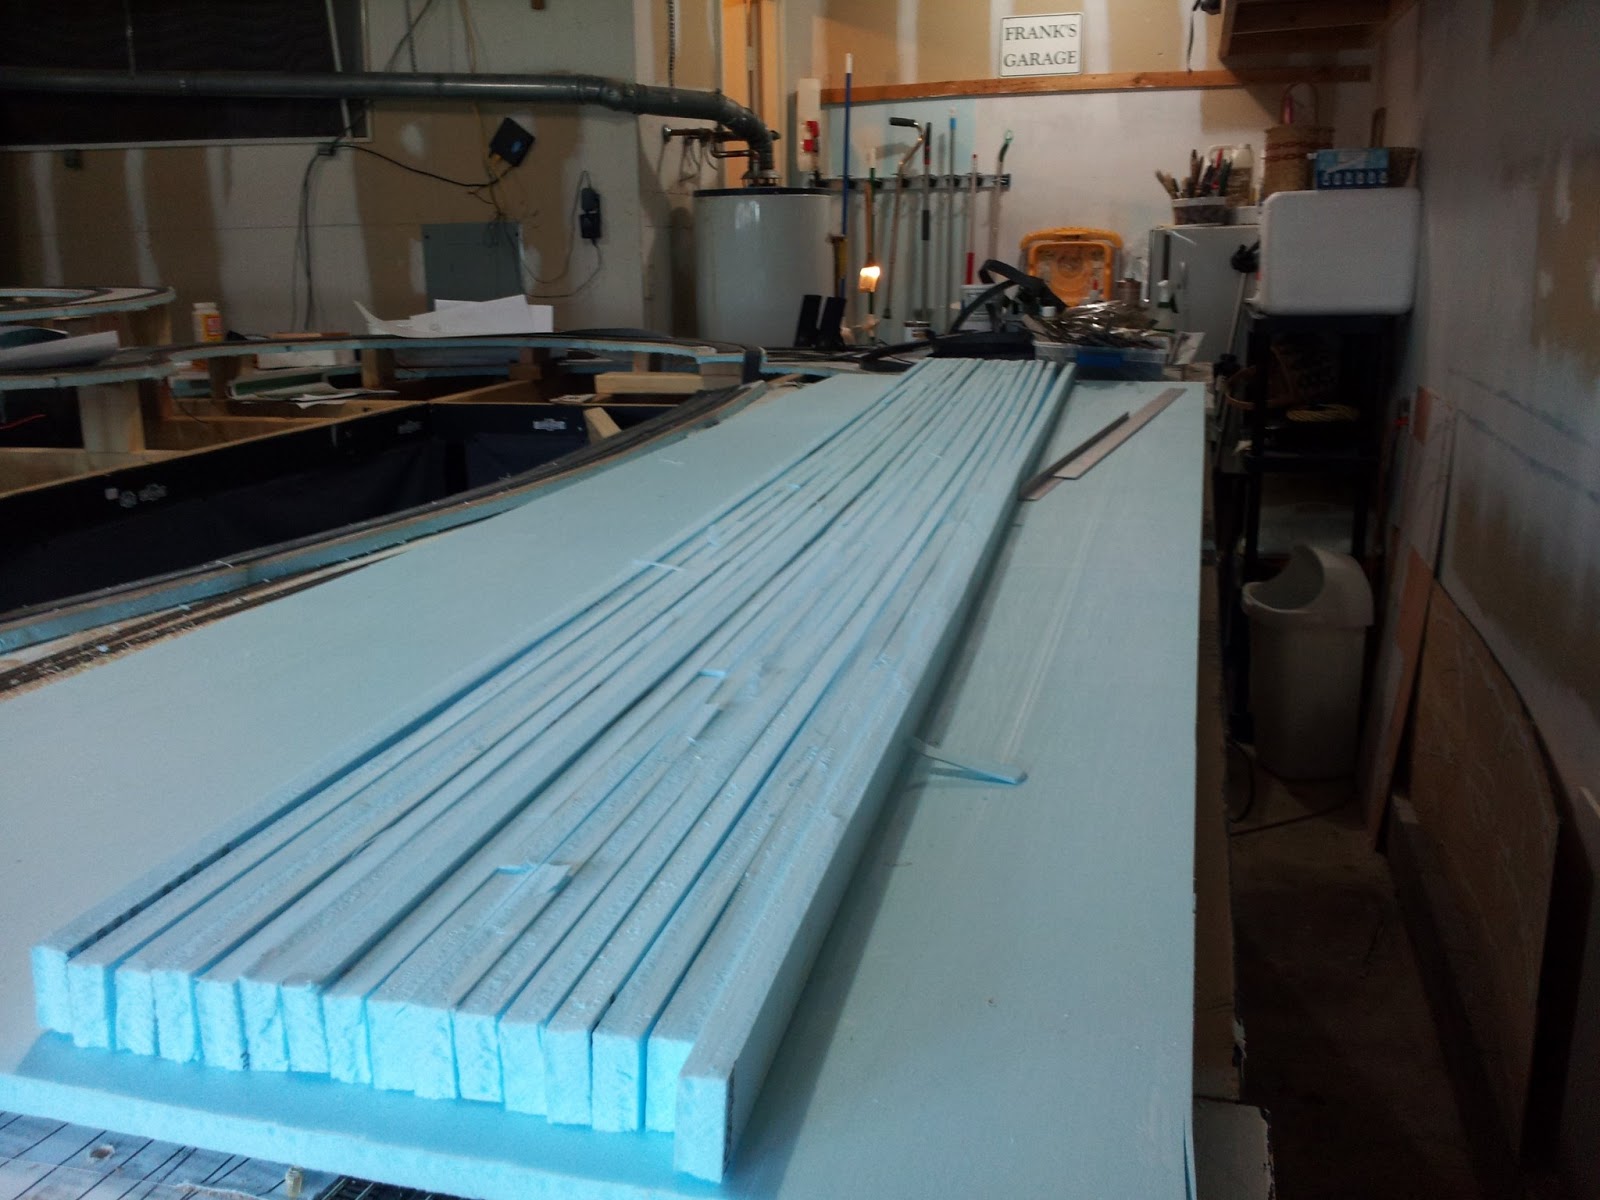
These splines are very flexible horizontally, like flex track. They can be formed into long graceful curves. They can be curved into a radius of about 12" before they will snap. I suppose if great care was taken, they could form even tighter curves. I prefer wider curves as they look more realistic. On the Allegheny Eastern the minimum radius for mainline curves is about 18".

I have found that the splines must be used in sets. For one track, two splines laminated together are exactly the right size. Two tracks requires four splines, and four track, the typical arrangement on the All East, requires eight. To make any of these configurations I simply laminate the correct number of splines together using a foam compatible glue. I personally use Aileens Tacky Glue from a local craft store. It's flexible, and holds tight. It's like white glue but dries to a rubbery consistency.

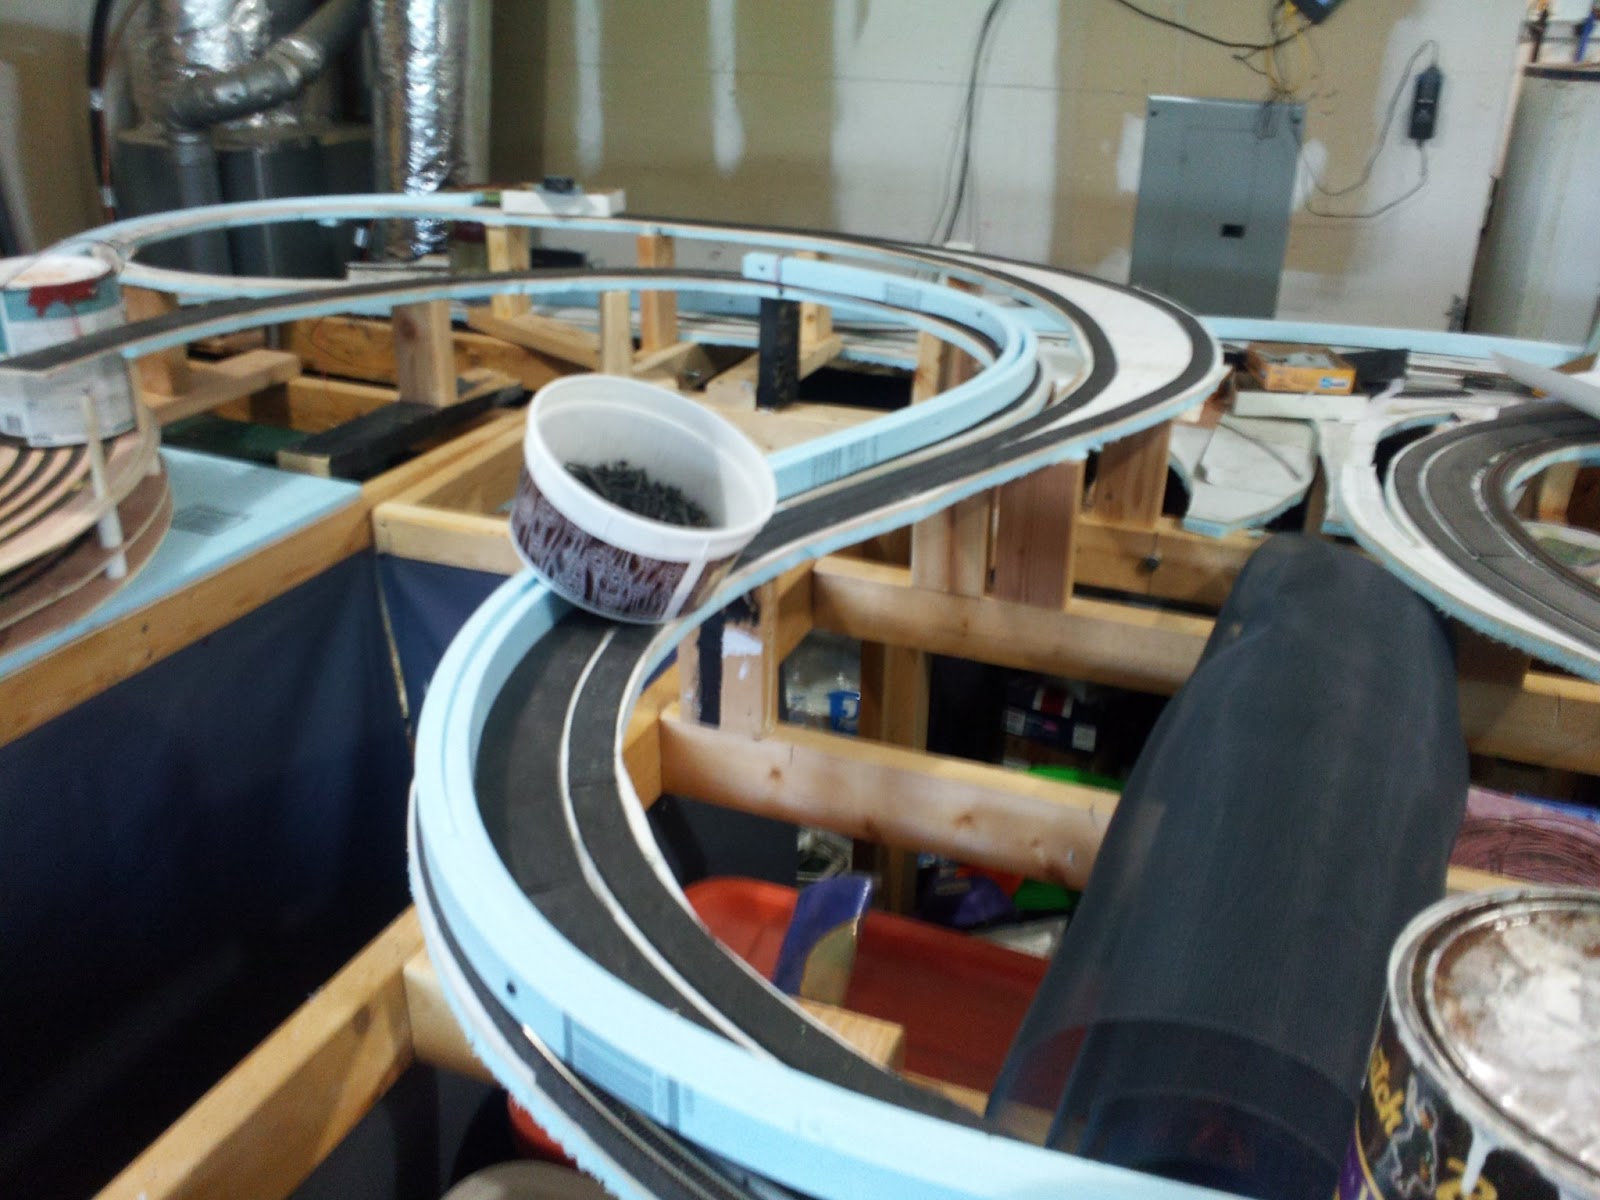
I usually lay out the roadbed ahead of time and use coffee cans full of bolts (and/or paint cans) to hold it in position until I get an alignment that suits me and follows the general lines of the track plan...


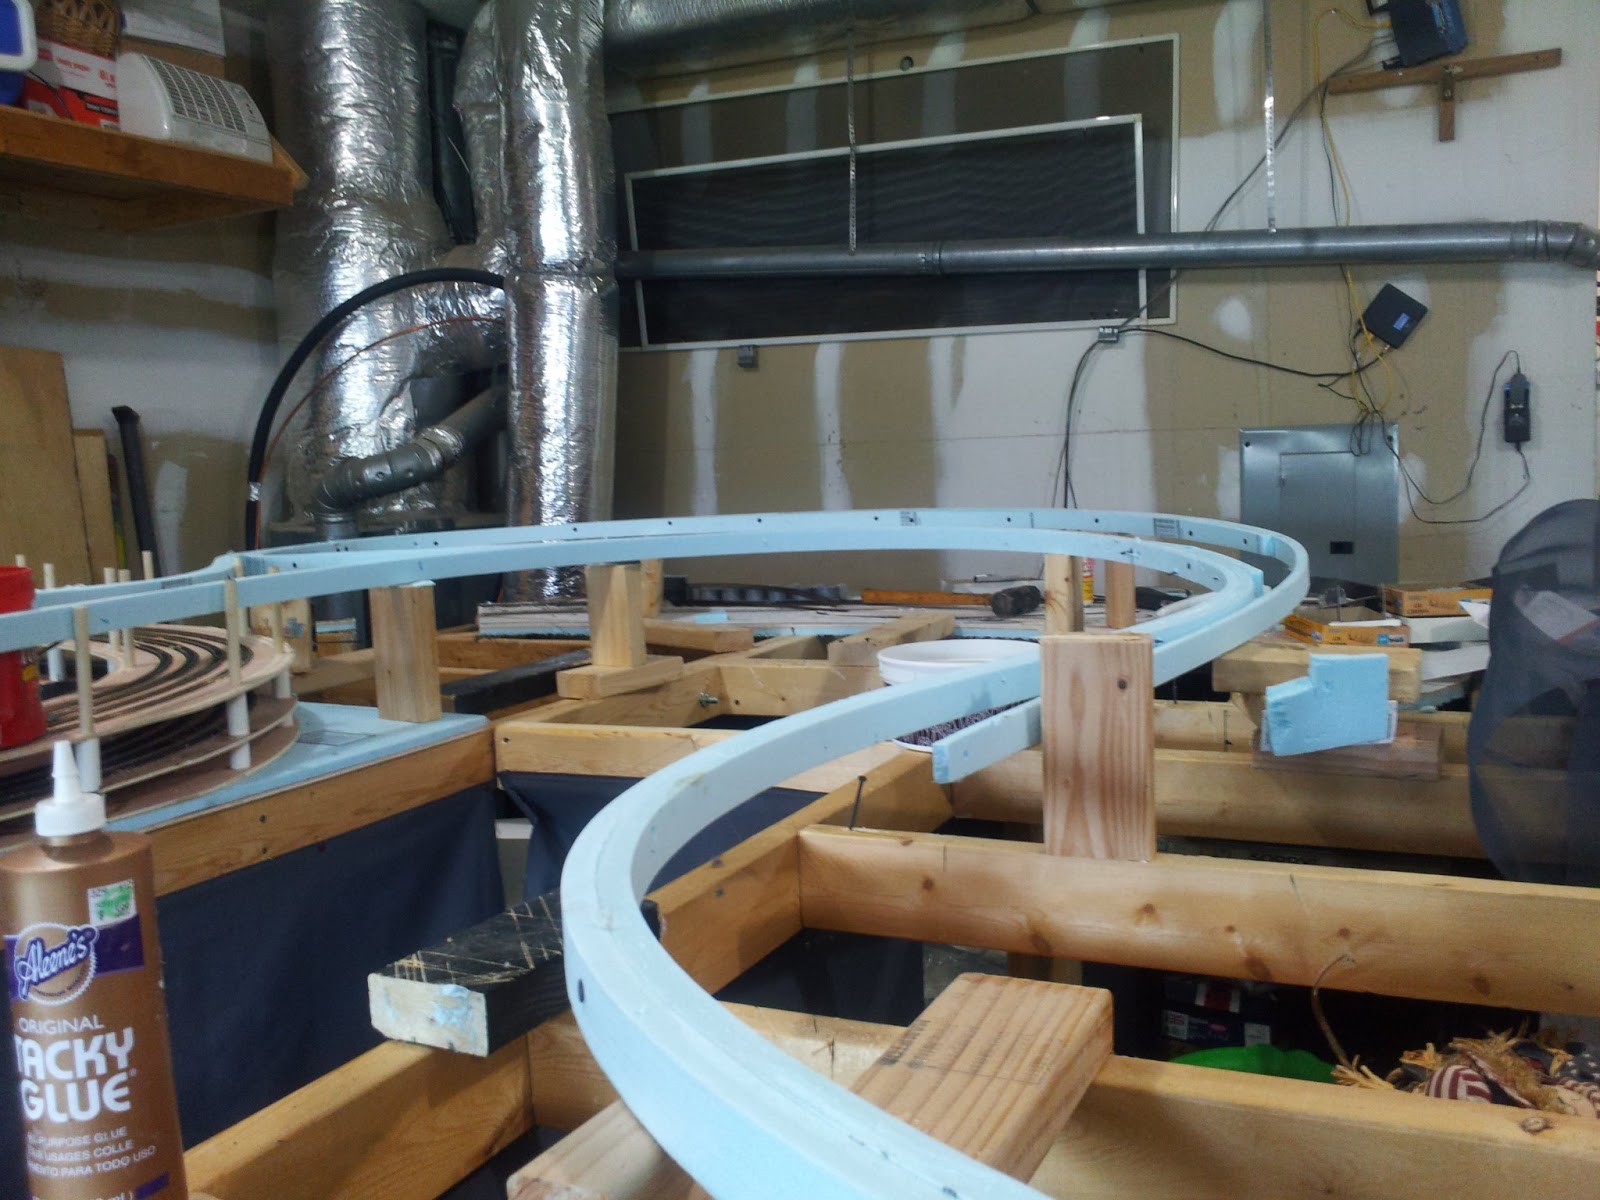
I then begin gluing up the splines. On my four track mainline I glue up the first pair and let the glue set...


I find that laying the first pair as far as I am able is the best method of constructing the roadbed. This primary layup goes pretty quickly. I can do the entire length of the main grade, about 33 or so feet, in a few hours...

This creates the general arrangement of the track for all the other splines to follow. Each additional spline is then glued to the previous one to form a horizontal lamination...

One other reason I try to complete an entire section is the fact that the splines never line up length wise. They all start out 96" long but as each spline gets further from the center of whatever curve they form they wind up with staggered ends...

This "offset" gets more prominent the longer the roadbed gets. What starts as a half inch after the first curve can grow to a foot or so at the far end of the roadbed. This offset is actually a good thing, The more staggered the joints are, the stronger they will be after the glue sets. In fact, it's a good idea to stagger the splines as much as possible. It's rather like laying boards in a hardwood floor. You do not want the joints to line up.

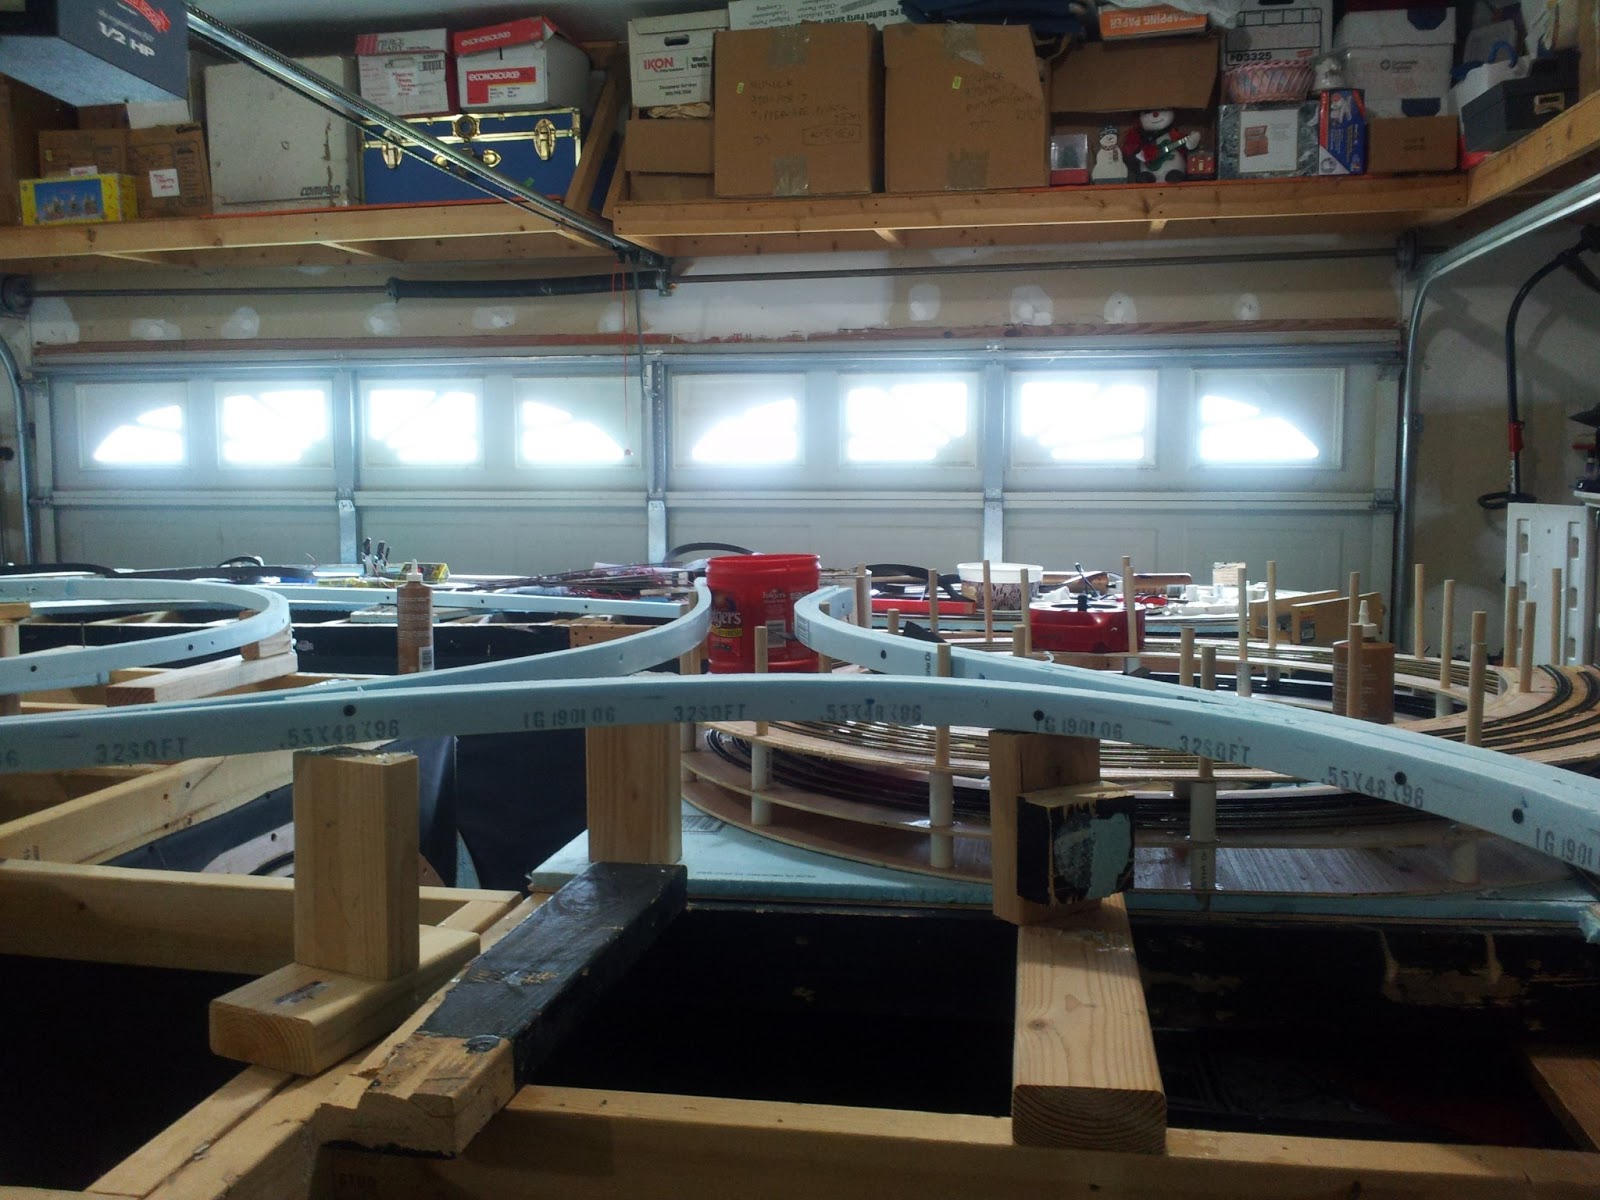
There is one other odd thing to way I lay road bed. Following the conventional way you would extend the roadbed a little at a time, placing risers at regular intervals at certain heights. On the Allegheny Eastern I build the road bed first and then elevate it to create the desired grade. The splines allow me to create roadbed that is essentially one long laminated piece. In creating grades I start from the top and install and adjust risers so I can maintain a smooth slope to the bottom. This does not mean that I "eyeball" the incline. I know ahead of time how high the grade will go and how long it must be to maintain the desired percentage. The All East climbs to a height of 106 scale feet as it winds its way up the east slope of the Alleghenies. The resulting grade is about a scale mile long at a constant 2%.

I think photos can reveal more of the process than all the words I can ever type. We'll follow the unfinished roadbed from Tunnel Hill down to BO tower...


This helix represents the west slope of the Allegheny Mountains. It's a 100 odd scale feet high overall and a scale mile or so long.


Tunnel Hill is the highest point on the All East and the summit of both eastern and western grades. It's also the location of the loop where helpers turn around and head back down The Hill.


Remington, where the four track main splits in two to pass through the tunnels at Sugar Run Gap.


At Kittanning Curve the Allegheny Eastern four track mainline loops like a giant horseshoe around the Burgoon Valley.


The bottom of The Hill at BO tower where helpers are assigned to trains for the climb to the summit.

The photo at BO tower shows a transition from plywood table top to the styrospline roadbed. This is about to change as the entire mainline is being reconstructed with splines. The plywood under the Llyswen yards and certain other areas will be replace with 2" thick extruded styrofoam sheets.


The ongoing (and rather insane) saga of the construction of the Allegheny Eastern can be found at http://kelticsylk.blogspot.com/
« Last Edit: April 15, 2013, 07:40:45 AM by kelticsylk »

Lemosteam

  • Crew
  • *
  • Posts: 5743
  • Gender: Male
  • PRR, The Standard Railroad of my World
  • Respect: +3123
    • Designer at Keystone Details
Re: Styrosplines
« Reply #1 on: April 15, 2013, 06:39:55 AM »
0
Frank,

Very cool-  I love this idea and thanks for posting it!

Using a table saw, one could reverse the blade so the points are facing away and rip off pieces.  Accuracy over a blade would be increased dramatically, probably to the point where once glued up, no smoothing would be required under the track. 

Question- how far apart do the supports need to be and have you tested for sag over time?


Scottl

  • Crew
  • *
  • Posts: 4700
  • Respect: +1139
Re: Styrosplines
« Reply #2 on: April 15, 2013, 06:51:19 AM »
0
I was wondering what you were using from the pictures in your blog.  Thanks for the write up.  A clever thing to use and a great alternative to the old school spline material (Homastote).

kelticsylk

  • Crew
  • *
  • Posts: 781
  • Respect: 0
    • Milepost 15
Re: Styrosplines
« Reply #3 on: April 15, 2013, 07:38:07 AM »
0
Frank,

Very cool-  I love this idea and thanks for posting it!

Using a table saw, one could reverse the blade so the points are facing away and rip off pieces.  Accuracy over a blade would be increased dramatically, probably to the point where once glued up, no smoothing would be required under the track. 

Question- how far apart do the supports need to be and have you tested for sag over time?

The table saw idea is a good one. I'll have to borrow mine back from my son in law.

On the All East supports are spaced about one foot apart. That's the spacing between crosspieces in my 2' x 4' grid benchwork. As for the sag, once the splines are laminated they get pretty "inflexible" horizontally and vertically. Horizontally, once the glue sets up the curves etc are in the spline to stay. Vertically, lifting a section results in lifting the entire roadbed over a certain area. It plays havoc with the temporary supports. They tend to fall or get knocked over.

I will try to post some photos of how the splines do at supporting weight. If I find they need more support I'll show that too.

kelticsylk

  • Crew
  • *
  • Posts: 781
  • Respect: 0
    • Milepost 15
Re: Styrosplines
« Reply #4 on: April 15, 2013, 07:40:07 AM »
0
I was wondering what you were using from the pictures in your blog.  Thanks for the write up.  A clever thing to use and a great alternative to the old school spline material (Homastote).

Although I have tried splines made from other materials, they didn't go together as easily as these. As for Homosote, I have never been able to find the stuff since I first saw it mentioned in magazine articles years ago. I must shop at the wrong lumber yards.

C855B

  • Crew
  • *
  • Posts: 10669
  • Respect: +2285
Re: Styrosplines
« Reply #5 on: April 15, 2013, 09:20:42 AM »
0
"Styrosplines" is a great idea. I'm going to rain on the table saw idea a little, however - foam dust, everywhere, sticking to everything. Found out the hard way. Even with a vacuum collection system, it's just impossible to control (and the vacuum filter clogged after about the third cut, anyway). I mitigated some of the dust by creating a cutting jig with over and under cutting guides, then using a Sawzall with an extra-fine (metals) blade... but that's no longer a table saw, is it?  :D

Using the 1/2" material makes it possible to cut with a utility knife, or even a carpet knife with its longer blade. I noticed that Frank used a utility knife blade and a hunk of fabrication aluminum - that's the right idea, but I would extend it into making a jig with a backstop and clamping the straightedge. That won't completely solve the unevenness of the hand-held cut, but it will help a lot by not having to pull the knife, hold the straightedge and keep the material still. You can then put all your attention and effort into the cut.

Lemosteam

  • Crew
  • *
  • Posts: 5743
  • Gender: Male
  • PRR, The Standard Railroad of my World
  • Respect: +3123
    • Designer at Keystone Details
Re: Styrosplines
« Reply #6 on: April 15, 2013, 09:39:46 AM »
0
C855B,  Dust is dust, and foam is no worse than MDF.  There's no way to keep a knife blade perpendicular to the foam for the entire length of the cut IMHO.  Would I cut it in my layout room, no:  But in my garage, you bet.

With knife cuts I'd be belt sanding the entire spline after install which might be hard to get to with the belt sander.  One stands a much better chance of a smooth spline surface under the roadbed if the strips are cut perpendiclar.  You could put a straight edge on top to align all strips at each clamping point.

Frank, I also bet that with warm weather coming, leaving the splines in the sun would make for eaiser bending too for someone with smaller curves.  I would also consider a 45 degree angle on the ends to create a "glueable" overlap, much the way a long piece of moulding is installed where a joint is required along a long wall.  Carpenters eliminate a butt-joint this way.

C855B

  • Crew
  • *
  • Posts: 10669
  • Respect: +2285
Re: Styrosplines
« Reply #7 on: April 15, 2013, 10:14:08 AM »
0
Huh? Foam is much worse than MDF, at least in my experience. The dust is not just dust. It holds a static charge and clings to surfaces. Even undersides - it defies gravity. I'm just sayin' - it's a pill managing foam sawdust. Just ask my wife.

If keeping the blade perpendicular is the concern, then make a tool for that, too. A skate with a sole plate you clamp a blade to would solve the problem, and even further reduce the reliance on brute strength to keep everything aligned. I think we have similar strip cutters in the modeling world for doing this with basswood or sheet plastics - just scale it up.

Lemosteam

  • Crew
  • *
  • Posts: 5743
  • Gender: Male
  • PRR, The Standard Railroad of my World
  • Respect: +3123
    • Designer at Keystone Details
Re: Styrosplines
« Reply #8 on: April 15, 2013, 10:21:50 AM »
0
Yeah that might work.  But then you're talking special tools, etc. that many might not be willing to make.  It is what it is. 

Personally I'd have no qualms about cutting the foam in my garage.

DKS

  • The Pitt
  • Crew
  • *
  • Posts: 13424
  • Respect: +7024
Re: Styrosplines
« Reply #9 on: April 15, 2013, 11:05:27 AM »
0
Huh? Foam is much worse than MDF, at least in my experience. The dust is not just dust. It holds a static charge and clings to surfaces. Even undersides - it defies gravity. I'm just sayin' - it's a pill managing foam sawdust.

What he said. One solution: a hot wire cutter. You can get them that look like a jigsaw cutter for slicing large sheets into strips. Or, I also use a packing knife. But sawing foam? Nope.

One concern I'd have about foam splines is strength. Some of us are clumsy, and I'd hate to see what might happen if one stumbled and instinctively reached out to grab a spline and---
« Last Edit: April 15, 2013, 11:07:57 AM by David K. Smith »

wcfn100

  • Crew
  • *
  • Posts: 8796
  • Respect: +1128
    • Chicago Great Western Modeler
Re: Styrosplines
« Reply #10 on: April 15, 2013, 11:18:08 AM »
0
. But sawing foam? Nope.

A Jig Saw with a smooth blade will cut foam with no mess.

Jason

chicken45

  • Crew
  • *
  • Posts: 4500
  • Gender: Male
  • Will rim for upvotes.
  • Respect: +1013
    • Facebook Profile
Re: Styrosplines
« Reply #11 on: April 15, 2013, 11:25:03 AM »
0
That blue stuff is toxic when it burns, right?
Josh Surkosky

Here's a Clerihew about Ed. K.

Ed Kapucinski
Every night, he plants a new tree.
But mention his law
and you've pulled your last straw!

Alternate version:
Ed Kapucinski
Every night, he plants a new tree.
He asks excitedly "Did you say Ménage à Trois?"
No, I said "Ed's Law."

C855B

  • Crew
  • *
  • Posts: 10669
  • Respect: +2285
Re: Styrosplines
« Reply #12 on: April 15, 2013, 12:17:29 PM »
0
That blue stuff is toxic when it burns, right?

I don't think so, at least based on the manufacturers' information for code compliance. I looked into this before committing to the foam-as-layout-material concept, and the extruded foams (pink and blue) are not toxic, and also pass important flammability tests. Definitely less flammable than wood. I think the conventional wisdom about foam toxicity when exposed to flame relate to soft foams such as used in furniture cushions.

kelticsylk

  • Crew
  • *
  • Posts: 781
  • Respect: 0
    • Milepost 15
Re: Styrosplines
« Reply #13 on: April 15, 2013, 03:27:54 PM »
0
I came up with a simple and accurate way to cut these splines without creating a mess. Behold! ThingX...


It's an old drywall straightedge that I "kitbashed" into a cutter...
« Last Edit: April 15, 2013, 03:30:55 PM by kelticsylk »

kelticsylk

  • Crew
  • *
  • Posts: 781
  • Respect: 0
    • Milepost 15
Re: Styrosplines
« Reply #14 on: April 15, 2013, 03:36:10 PM »
0
Based on question I did some testing related to sag and support issues...

Single track spline under 10 pounds...


Under 16 pounds...


Under 25 pounds...


After test...


Remember the spline is not fastened to anything, it's just resting on the wood blocks. I have a feeling that permanently fastening it in place would make it even stronger.