Author Topic: 2 Function Decoder Ditch Lighs?  (Read 1660 times)

0 Members and 1 Guest are viewing this topic.

Guilford Guy

  • Crew
  • *
  • Posts: 633
  • Gender: Male
  • hates trains
  • Respect: +27
2 Function Decoder Ditch Lighs?
« on: November 15, 2009, 11:08:34 PM »
0
I recently purchased a pair of GP15-1s, which would always be running in tandem on my friends layout. My friend offered to supply decoders and paint, and I the locomotives and time. Each of us would get the pair 6 months out of the year. I would like to have operating ditch lights on the units for use at shows and my home layout which is set in the present. I am not concerned with them being solid, non alternating ditch lights, merely being able to light them when approaching a crossing, by pressing Function 1. The TCS Decoders do support function remapping, and since the units will always be permanently MUed, would it be possible to remap the yellow wire (Rear Headlight) to activate when F1 is pressed. Each unit would have them on their forward pilot, and the set would be operating bi-directionally under normal circumstances.
Thanks,
Alex
if you can't conduct yourself, conduct freight


Packer

  • Crew
  • *
  • Posts: 742
  • Gender: Male
  • Respect: +1
Re: 2 Function Decoder Ditch Lighs?
« Reply #1 on: November 16, 2009, 05:20:59 PM »
0
It should be possible, haven't tried that with a 2-function TCS decoder though.

I've been doing that for a while on units that are usually consisted. That way the unused rear light becomes a rotary beacon or a mars light when going foward, and no lights in reverse.

Edit:
http://www.tcsdcc.com/Customer_Content/Literature/Decoders/HO_Scale/T-Series/T1BEMFWEB.pdf
Based on that, I'm guessing you could set CV50 to 7 to get it to be dimmable by pressing 4.
http://www.tcsdcc.com/Customer_Content/Technical_Info/Tech_Manuals/FunctionRemapping.pdf
Then program CV 123 to 4. That would make it always on, but you could make it dimmer or brighter.

Or CV50 to 0 and CV 34 to 4. You might want to play around with CV, you mght get something that looks like the blinking you're after.

Personally, I'd program to be with function 2 in the event you getsound decoders for the units.
« Last Edit: November 16, 2009, 05:34:16 PM by Packer »
Vincent

If N scale had good SD40-2s, C30-7s, U30Cs, SD45s, SD40s, and SW10s; I'd be in N scale.

Jim Starbuck

  • Crew
  • *
  • Posts: 841
  • Respect: +2090
Re: 2 Function Decoder Ditch Lighs?
« Reply #2 on: November 22, 2009, 09:46:57 PM »
0
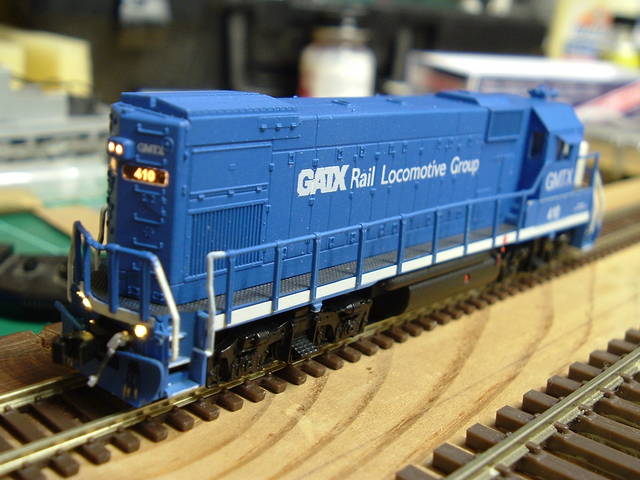
Yes, you can remap the yellow wire to function 1 and run a pair of LEDs in series for the ditch lights.
You will need to add a resistor between the yellow wire and the LEDs.
A 360 ohm 1/4 watt should work. That's figured on a supply voltage of 13.5 and LEDs at 3.3 volts and 20mA.

Here's one I did a while back.
Modutrak Iowa Division
Modutrak.com
Better modeling through peer pressure

Heath

  • Guest
Re: 2 Function Decoder Ditch Lighs?
« Reply #3 on: November 25, 2009, 04:12:09 PM »
0
Do you have a pic with the shell off for a newbie to dcc ,also whose leds did you use? I want to do this to my gp15's but want to do it right yours look awesome this is what I want mine to look like.

Jim Starbuck

  • Crew
  • *
  • Posts: 841
  • Respect: +2090
Re: 2 Function Decoder Ditch Lighs?
« Reply #4 on: November 26, 2009, 09:55:55 AM »
0
Heath,

I don't have a pic of the install just yet but the process is fairly simple.
I drilled holes in the pilot and glued in surface mount LEDs to the backside with Kristal Klear. The LEDs shine through the holes.
The LEDs are connected with magnet wire which is only .0045". The wires are just taped to the inside of the shell to assist in routing.
I would highly recommend using a Train Control Systems ASD4 decoder for your installation.  It's a direct drop in board for the GP15-1 and it is set up so you can wire low voltage LEDs directly to the function pads without using additional resistors.
I also installed ditch lights on the long hood end of this engine and the functions are mapped like this:
F0=front light
F1=rear light
F3=front ditch lights
F4=pushbutton dimming of the active bright headlight
F5=rear ditch lights
Rule 17 directional dimming is enabled so when you change direction, the opposite headlight dims. The ditchlights remain at constant brightness.
When you want to consist, you can turn off the rear lights, have the front ditchlights on, the lead headlight on bright and the trailing headlight on dim or turned off altogether.  When you come to a meet, you can stop the train, turn off the front ditchlights, dim the headlight and allow the other train to pass.
The LEDs came from TCS, but you can get them and magnet wire from N-gineering.
PM me off line and I can help line you up with what you'll need for yours.

Jim
« Last Edit: November 26, 2009, 10:20:58 AM by Skytop 47 »
Modutrak Iowa Division
Modutrak.com
Better modeling through peer pressure