Author Topic: UP's N Scale Canyon Division Layout Build....  (Read 8975 times)

StewRRFan and 1 Guest are viewing this topic.

Sumner

  • Crew
  • *
  • Posts: 525
  • Gender: Male
  • Respect: +1422
    • My Home Pages....
Re: UP's N Scale Canyon Division Layout Build....
« Reply #45 on: March 25, 2025, 11:34:44 AM »
+6
.... continuing on the next day....


It will be nice when the scenery is finished and there are tracks here and I can reproduce this image of the scene.


I’ll wait on finishing the area to the right until I’ve finished roughing in the foam to and from the coal mine complex that is out of sight to the right above.


.


I’ll make a turnout from a Fast Tracks template for above. Nice thing about making turnouts is you can make one to fit the scene and not have to make a scene fit a turnout.


.


At 81 I’m slowing down and can only work on this section where I’m stepping on and off that platform about 4 hours a day. A couple in the morning and a couple in the afternoon.

I think 3-4 days and I’ll have all the foam in the area above over to the track elevator out of view to the left. Then it will be Spackling and paint time. Then need some clouds, mesas and distant mountains painted on the backdrop. I hope to find someone from the art program at the local college here to do that but will try it myself if that doesn’t materialize. To be continued…....

A link to this whole build ( HERE ).

Sumner
Working in N Scale ---Modeling UP from late 40's to early 70's very loosely......

Under$8.00 Servo turnout Control --- 3D Printed Model RR Objects -- My Home Page

http://1fatgmc.com/RailRoad/RR Main/Link Page Menu.html

Sumner

  • Crew
  • *
  • Posts: 525
  • Gender: Male
  • Respect: +1422
    • My Home Pages....
Re: UP's N Scale Canyon Division Layout Build....
« Reply #46 on: March 28, 2025, 12:40:19 PM »
+5
Scenery to Track Elevator – Part 3 ....

Continuing on with the scenery on the upper level going to the track elevator and taking a short break to build most of a curved turnout and a first attempt at backdrop painting ……...


Working with stacked foam can go pretty fast. One aspect is how to cut and fit it into the scene where you need it. I’ve covered this before on the build but thought I’d give a quick update again. Using a paper towel to make a pattern is simple and easy as it conforms easily to the area where you are working.


I cut pieces out with a hot knife and/or with a Ryobi bandsaw I bought some years ago. Both work well but I can get the cleanest/straightest edges where pieces butt up against each other with the band saw. More foam mess with it though and as I head back to where I’m working I use the shop vac to such the foam particles that are stuck to the piece due to static electricity off.


I love the ‘router’ hot wire knife as I can bent the wire to work well in different situations. Well worth the price which isn’t that bad. I think of it more like a ‘sculpting’ tool and not so much a router myself (think they should rename it).


The last thing I did for this section was to add some thinner cap-rock. I might be able to add a little vegetation on the top of the mesa.


Since the track-work under the scenery here is a little complicated with the crossing I want this piece to lift off so I can get to it anytime I need to.


Instead of really wearing myself out like I had on the couple previous days I took a break and started on a curved turnout that I needed for the one end of the track in this area.


I cut my PCB ties from pieces of PCB that I get really cheap on eBay (.030-032” double sided PCB). I cut enough ties for this turnout and one or two more in less than 10 minutes. Using those and individual wooden ties vs. the tie strips I can build a turnout for under $5.00. More info on all of that ( HERE ) .


The turnout when finished will go just past the tunnel portal. Being able to use a curved turnout here allowed the passing siding past it to be over a foot longer and also didn’t interfere with where I wanted a side canyon with a bridge over it.

As I mentioned in the image above ‘building your own turnouts lets you build turnouts to fit the scenery and you don’t have to make the scenery fit the turnouts. You can have turnouts that aren’t available and also have 5 or 6 for the price of one and they aren’t that hard to build after you do a few.


I want to finish all of the scenery above and by the tracks that go in this area before laying them so had to take the plunge on trying to paint the backdrop. I watched one of Dave’s ThunderMesaStudio  videos on painting clouds and tried some clouds. I’ll come back and touch them up some more and try some other cloud variations but overall fairly happy with the results.


Next up I think will be Spackeling the track in this area and then finish the scenery down to the lower level and then paint it all.

To be continued…....

A link to this whole build ( HERE ) .

Sumner
« Last Edit: March 28, 2025, 12:44:16 PM by Sumner »
Working in N Scale ---Modeling UP from late 40's to early 70's very loosely......

Under$8.00 Servo turnout Control --- 3D Printed Model RR Objects -- My Home Page

http://1fatgmc.com/RailRoad/RR Main/Link Page Menu.html

Sumner

  • Crew
  • *
  • Posts: 525
  • Gender: Male
  • Respect: +1422
    • My Home Pages....
Re: UP's N Scale Canyon Division Layout Build....
« Reply #47 on: March 30, 2025, 11:58:11 AM »
+2
Scenery to Track Elevator – Part 4

Continuing on with the backdrop painting on the upper level going to the track elevator……...


I want to go back and redo some of the cloud work but also wanted to take a crack at painting the backdrop scenery as I wasn’t having much luck finding a local college art student to do the painting even though I’d pay them. Couldn’t get the art teacher to respond so couldn’t get to a student.

I started by spending an hour or so looking over PAINTING BACKDROPS FOR YOUR MODEL RAILROAD by Mike Danneman. I’d bought the book some years ago but hadn’t spent much time with it. It is good and I recommend it but for me it has one or two problems. One is that he is a very accomplished painter and the detail in his paintings is probably an unrealistic outcome for any of us that haven’t painted or painted very little in our past. He also tends to skip over steps that would be helpful for those of us with little experience in painting. Saying that though there is good information to be had from the book and I recommend getting it if you go down this road.

I also went back and watched parts of Dave’s ‘Calico Mountain Expansion Part 6: The Backdrop’ video. His style is a little different than what I want but still the concepts he talks about are of great help and strongly recommend the video and others he has. His video’s on using the stacked foam board were a big help to me.

I started by sketching in a rough idea of what I thought I wanted above and in the next image.


I stood back and was pretty satisfied where I was going to get out the paint.


As per what I’d seen and read I started with the more distant mountains. They are blends of the upper sky color along with white and some black.


Used some white for the snow and some green I had mixed with black and burnt umber (had a tube of this) to help give the impression of some trees down the slope some.


Next I moved onto the mesas in the foreground.


I have some paint in tubes that I kept from some years ago that went pretty much unused. I use it when painting some of my 3D printed items and brought it out for this also but hardly used any at this point. The burnt umber I mentioned above for the trees and the titanium white shown above but they stopped using it for all of my white (only small highlights).

What I did use is the acrylic latex house paint that I had bought for the foam scenery and what will also be used in this area below the backdrop. You can see it used earlier in the build ( HERE ). If you are interested in trying this I’d go to that link for more information on the paint and how I used it. I’ll be reviewing that myself next.


.


.   


Over all I’m happy with the backdrop but will be making some changes as described above.


I made  the short 1 minute video above showing the backdrop as it is now.
To be continued…....

A link to this whole build ( HERE ).

Sumner
Working in N Scale ---Modeling UP from late 40's to early 70's very loosely......

Under$8.00 Servo turnout Control --- 3D Printed Model RR Objects -- My Home Page

http://1fatgmc.com/RailRoad/RR Main/Link Page Menu.html

Sumner

  • Crew
  • *
  • Posts: 525
  • Gender: Male
  • Respect: +1422
    • My Home Pages....
Re: UP's N Scale Canyon Division Layout Build....
« Reply #48 on: April 01, 2025, 04:39:27 PM »
+5
Scenery to Track Elevator – Part 5

Continuing with the scenery on the upper level going to the track elevator……...


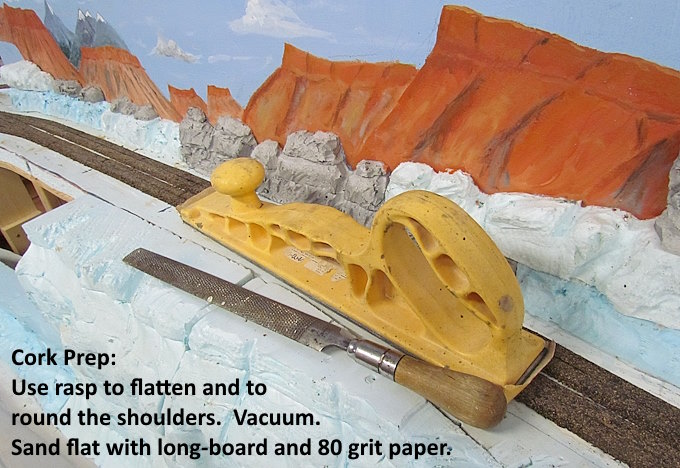
When I get the scenery finished just past the cork roadbed and the backdrop finished I want to lay the track here. I’m glad that I haven’t laid it to this point as it is so much easier working here without the track to consider. I’ve found that I can prepare the cork very quickly using a couple simple tools.

I start with the course rasp I’ve had for years. I rounds the shoulders off and cuts any height irregularities down very quickly. Next I’ll hit the top of the cork and the shoulders a tad with the long board (or a shorter sanding pad) with 80 grit dry sandpaper.


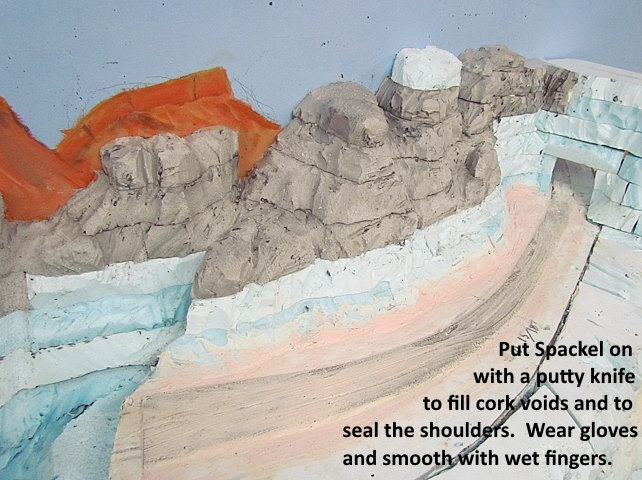
Next I’ll put spackling (not drywall mud) on with a putty knife. I scrape almost all of it off as I only want to fill any voids in areas her there will be a turnout and the cork isn’t a perfect fit and areas between the two cork half’s themselves. I where the blue latex gloves doing this and will dip my hand in water and take my finger to wipe the top of the cork and to work the spackling in along the cork edges to seal it to the foam board. The foam board gives a great surface to lay the cork on and it was laid with the yellow wood glue. At this point the spackling surface should be very thin and mostly flat.


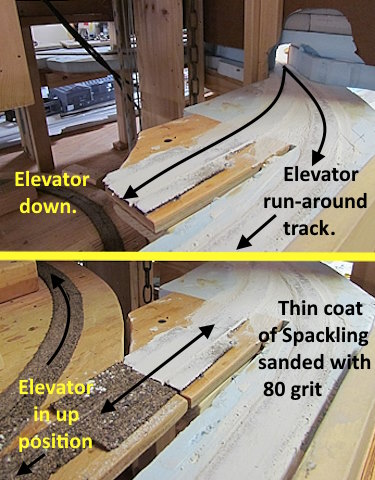
Then after the spackling dries overnight use the longboard with the 80 grit to sand it very flat. This sounds like a lot but I did the cork in this area and down to the elevator and the run-around track around it in about 30 minutes total. Next I’ll hit it with some grey primer that will make the track look better until I get to ballasting, if I get that far.

You end up with a very flat sealed surface to lay your track on with no dips, no voids and it didn’t take much time at all to do.


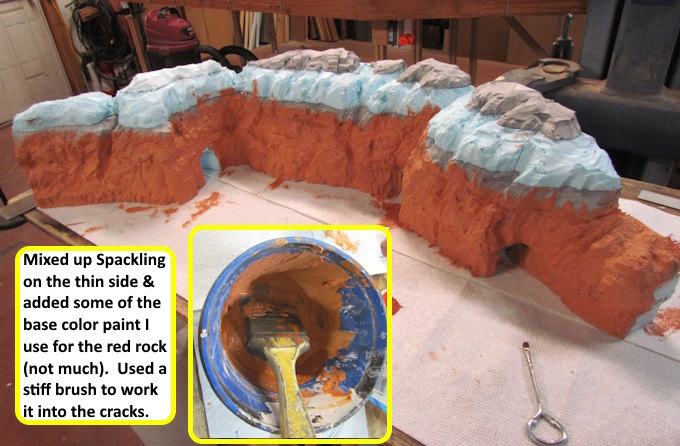
Next spackling (it is cheap) is mixed up with some extra water to a thinner consistency than what you would use in dry wall work. Add some of the base color paint you want for where you are doing the scenery. You won’t need much and I’m using regular acrylic latex house paint.

Above only the first 3 layers of foam will be covered at this point as the layers above those will be the cap rock and a different base color is needed there.

Use a short hair stiff brush to work it into the layer lines between foam layers and any other voids you have. Don’t use so much that you hide the detail that you carved in with your hot wire knife but fix screw-ups where you cut too much out. I also used a smaller brush you will see further below to help get the compound into tighter areas without building them up too much.

In this one step you have added the base coloring to the area and made it look less like stacked pieces of foam board.


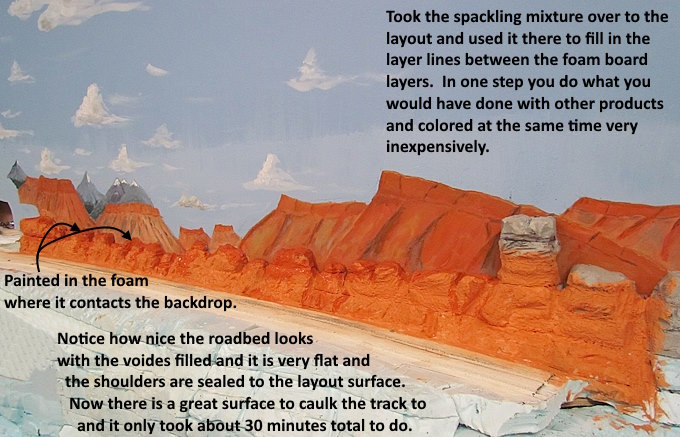
The same method was used to work the foam that was already glued to the layout. To keep the spackling off the back drop I didn’t apply it right to the backdrop but painted the foam there with a brush, hence the different color along the backdrop. It was the same color I mixed in but it shades out different once it is mixed with the spackling.


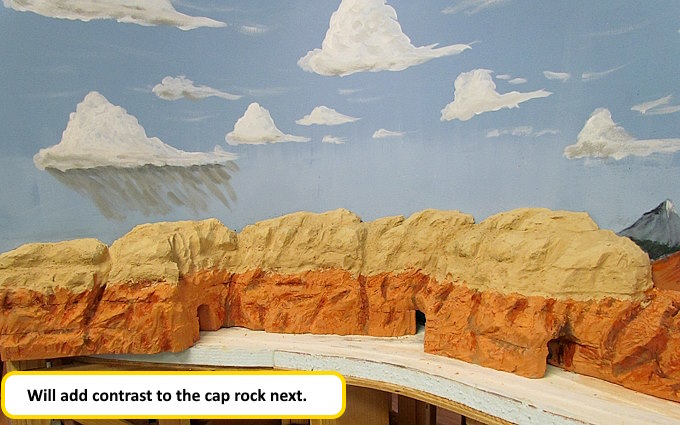
Next a little lighter shade of the base color that I had mixed at the hardware store was used for highlights and both colors were tinted a little with white and black for different tones. I also used a very diluted black wash (black paint with a lot of water mixed in) to darken some of the areas that would be in shadows or that were very recessed.

 Lots of experimenting as I went along and some painting back over the experiments.


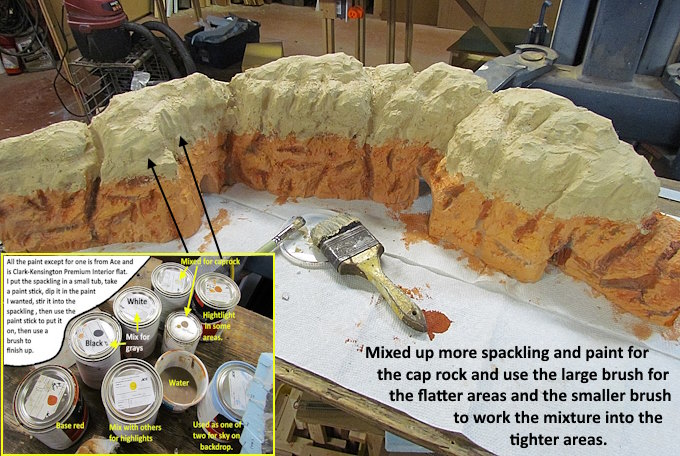
Next up the area that will be removable for track work was taken back over to a workbench and given the colored spackling process there. I mixed two colors for this area. The cap rock is suppose to look like the cap rock that you can see via the link in the next statement.

It is hard to see the paint combinations that are used in the image above but more about them when I was using them earlier in the build ( HERE ) .


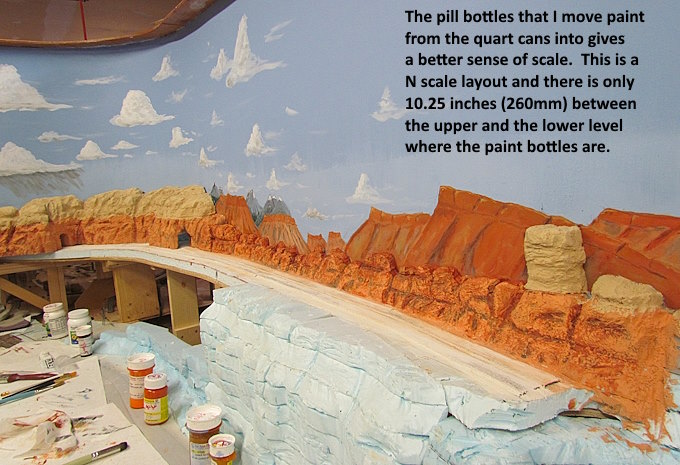
Hard to tell from pictures how large or small something is so hope the pill bottles give you a better idea above.


.


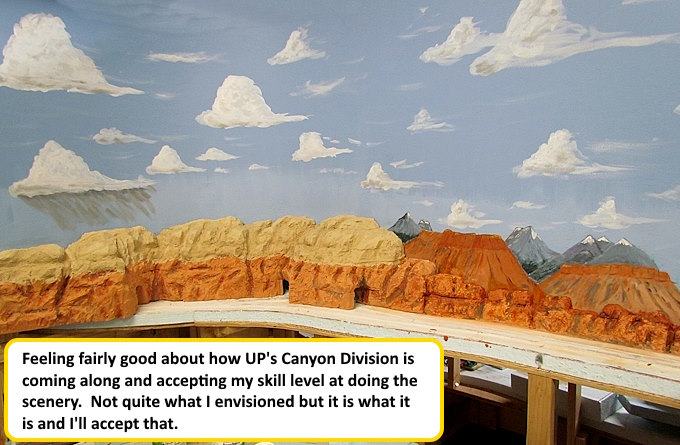
I think it is easy to let seeing really great work interfere with us at times in trying something new. It could be another person’s layout or any number of other things, like how someone welds or does woodworking. We want to be as good upfront and the fear of failure can maybe stop us from attempting something new at all. Hard to contemplate that they weren’t that accomplished on their first efforts.

We only get better by trying and I’m at a stage in life where this is probably my last try but I’m going to do what I can and be happy that I’m still here to do that.

To be continued…....

A link to this whole build ( HERE ) .

Sumner
Working in N Scale ---Modeling UP from late 40's to early 70's very loosely......

Under$8.00 Servo turnout Control --- 3D Printed Model RR Objects -- My Home Page

http://1fatgmc.com/RailRoad/RR Main/Link Page Menu.html

Sumner

  • Crew
  • *
  • Posts: 525
  • Gender: Male
  • Respect: +1422
    • My Home Pages....
Re: UP's N Scale Canyon Division Layout Build....
« Reply #49 on: April 03, 2025, 10:31:45 AM »
+3
Short update...


Above the caprock to the left has been highlighted with some different shades of the base colors by adding a little black or white to the two base colors that were used plus mixing the two colors together a little differently. I take the base colors and put a little of each on a cottage cheese lid pallet along with a little white and black and then mix away on the lid until I see something I like.


Take the loaded brush and brush most of the paint off onto a paper towel and then use a partially dry brush technique to apply it for the highlights of darker, lighter or different shades of the base color into the crevices and rock faces.
.
To be continued…....and a link to this backdrop and scenery work ( HERE ) .
.
A link to this whole build ( HERE ) .
.
Sumner
Working in N Scale ---Modeling UP from late 40's to early 70's very loosely......

Under$8.00 Servo turnout Control --- 3D Printed Model RR Objects -- My Home Page

http://1fatgmc.com/RailRoad/RR Main/Link Page Menu.html

Sumner

  • Crew
  • *
  • Posts: 525
  • Gender: Male
  • Respect: +1422
    • My Home Pages....
Re: UP's N Scale Canyon Division Layout Build....
« Reply #50 on: April 07, 2025, 08:03:04 PM »
+4
Scenery to Track Elevator – Part 6

Continuing with the scenery on the upper level going to the track elevator……...


Finally got back to this area of the layout and it feels good to be moving on with it.


I have turnouts in a couple places that will probably get servos under them. If not servos then one of the mechanically operated options I have. Either way they will initially be installed laying on the layout creeper  down below. If I need to adjust the limit switch that powers the frog polarity that would be easier to adjust from the side so I’m going to have it so I can lift out the scenery in a couple places in this area.


At least on end of the lift-out has to be angled, almost forgot that. I made the lift-out section and then, shown above, started on the strata to the left of it.


Down to the final section for this area.


This lower level went way faster than the one up by the backdrop and only took a couple partial days to do but I do have more practice at this point also.


I need to add some rock detail on the top of this section over to the track to break up the flatness of it. Nothing is flat or straight in nature. There is only about 130+ scale feet between the lower and upper level but for some reason it looks more than that.


I’m happy with the lift-out sections and feel that they aren’t too obvious when in place.

To be continued…....

A link to this whole build ( HERE ) .

Sumner
Working in N Scale ---Modeling UP from late 40's to early 70's very loosely......

Under$8.00 Servo turnout Control --- 3D Printed Model RR Objects -- My Home Page

http://1fatgmc.com/RailRoad/RR Main/Link Page Menu.html

Sumner

  • Crew
  • *
  • Posts: 525
  • Gender: Male
  • Respect: +1422
    • My Home Pages....
Re: UP's N Scale Canyon Division Layout Build....
« Reply #51 on: April 11, 2025, 12:11:31 PM »
+2
After the images above were taken I worked on the area where the top lift-off lays on the bottom lift-out section.


The top gray piece and other pieces to the right of it are about ¼” higher than the foam on the upper level bench-work. The area under the top scenery (not shown above) was cut out so that scenery recesses into the foam board shown above.


.


The area will still get ground cover later.

To be continued…....

A link to this whole build ( HERE ) .

Sumner
Working in N Scale ---Modeling UP from late 40's to early 70's very loosely......

Under$8.00 Servo turnout Control --- 3D Printed Model RR Objects -- My Home Page

http://1fatgmc.com/RailRoad/RR Main/Link Page Menu.html

Sumner

  • Crew
  • *
  • Posts: 525
  • Gender: Male
  • Respect: +1422
    • My Home Pages....
Re: UP's N Scale Canyon Division Layout Build....
« Reply #52 on: April 12, 2025, 09:26:50 AM »
+2
Scenery to Track Elevator – Part 7

Continuing with the scenery on the upper level going to the track elevator……...


I have the print files up on thingiverse for the double track plate girder bridge above and some other abutments where you can vary the angles. More info and print file links ( HERE ) . Also a different style 64 foot bridge ( HERE ) .


.   


.


I designed these abutments to fit the location. If you go to the link further above you can find the print file links to adjustable angle abutments.


The image above and the following ones show rock work that was added to hopefully break up the flat mesa top area where the tracks run.


.


A dirt service road was added that will come in along the rock face to the left and follow the tracks down to the plate girder bridge. It will provide a way for work crews to get to this area if needed.


Time for Spackling and paint.

To be continued…....

A link to this whole build ( HERE ) .

Sumner
Working in N Scale ---Modeling UP from late 40's to early 70's very loosely......

Under$8.00 Servo turnout Control --- 3D Printed Model RR Objects -- My Home Page

http://1fatgmc.com/RailRoad/RR Main/Link Page Menu.html

Sumner

  • Crew
  • *
  • Posts: 525
  • Gender: Male
  • Respect: +1422
    • My Home Pages....
Re: UP's N Scale Canyon Division Layout Build....
« Reply #53 on: April 13, 2025, 08:00:51 PM »
+2
Continuing on............


Up to this point I’ve usually colored the Spackle before applying it to the foam to fill holes and fill the seams between the foam board. On the next page you will see that I’ve, at least for now, will start applying the Spackle un-tinted and will explain why.


Next up is a big push to get this area covered in Spackle and then painted.

To be continued…....

A link to this whole build ( HERE ) .

Sumner
Working in N Scale ---Modeling UP from late 40's to early 70's very loosely......

Under$8.00 Servo turnout Control --- 3D Printed Model RR Objects -- My Home Page

http://1fatgmc.com/RailRoad/RR Main/Link Page Menu.html

Sumner

  • Crew
  • *
  • Posts: 525
  • Gender: Male
  • Respect: +1422
    • My Home Pages....
Re: UP's N Scale Canyon Division Layout Build....
« Reply #54 on: April 14, 2025, 02:22:19 PM »
+3
Scenery to Track Elevator – Part 8 & How to Apply Spackling to Foam Board...

How to apply Spackling to foam board and continuing with the scenery on the upper level going to the track elevator.

On this page I’ll go into my latest method of applying Spackling and painting it. By trying different tools and methods I’m probably doing this work about twice as fast as when I started with the foam scenery. I’ll probably be sticking pretty much with what I’m doing for the rest of the scenery build and there is still a lot to do.

I’m also really glad that I’m doing this now after laying the cork roadbed and before laying track and not having to work over it.


The tools shown above make adding the Spackling to the foam board a lot faster than some I was using, pretty much not using a putty knife any longer…. spatula works better.


The spackling out of the container is pretty stiff for working into the cracks of the foam board. Take your sponge, I always have water and a sponge in another container, and squeeze a little out into the spackling and stir it until it is fairly fluid but still sticks to the spoon if you turn it over.


Smear and spread the Spackling into the cracks and crevices and places you might of gone too far with the hot knife. When you have about what is shown on above move to ….


…. the brush that is pretty flexible. I keep it in the water…. Take it out…. wring the water out with your hand and then work the Spackling around to fill and smooth it. Try and get a light layer on all the foam to help seal it.

Brush in different directions to do this with a dryer brush. When it is where you want it leave just a bit more water on the brush and finish brushing more top to bottom, like water would flow down the rock face. You should be able to get most of the brush marks out and the surface will look pretty wet and almost fluid. Stop and let it dry like what is happening on the face to the right above. You can always come back and touch up if needed.


The area above was Spackled in three steps on the same day. There was foam and Spackle added to the left side of the top Lift-Off section. It and the section where the tunnel will be below it were separated just a bit so that the Spackling wouldn’t dry and stick them together.

The area going out of view to the right was Spackled the day before and painted on this day.


The area to the right of the canyon was painted the day before and the canyon and further to the left was painted on this same day along with the gray bottom layer.


Darker and lighter contrasts were added to the rock face with black washes and lighter colors. Will do more to this area but going slow as it goes on one shade and dries another so don’t want to overdo by going too much at once. It also goes really fast.


The image above demonstrates why I’m not tinting the Spackle any longer in most cases with the paint. The rock on the upper level, the lighter shades, was Spackled with the same paint that was painted on the lower level. Notice that the tinted rock came out much lighter in shade/color vs. the bottom rock face using the same paint.

I feel when tinting the Spackle it can be harder to duplicate what you did before as the tinted Spackle looks much darker when mixed and applied vs. later after it has dried.

The lighter shades of the rock on the upper level is the tinted Spackle and the darker contrasting color on that rock is the same paint that was used for the tinting. I think I’ll be able to get more predictable results by not tinting the Spackle in most cases.


The lower strata above has a narrow coal seam at the top of it. The rest is suppose to represent the Morrison Formation that is in this area and contains dinosaur fossils and uranium in it. The Morrison is associated with the red rock here but the coal is usually in deposits above the red rock formations. I have this more accurately depicted where the coal mine complex is on the layout.


Spackling and painting is just the first step. There hopefully will be a lot of ground cover added after I get the tracks in place and working here and other areas, lots of other areas..

To be continued…....

A link to this whole build ( HERE ) .

Sumner
Working in N Scale ---Modeling UP from late 40's to early 70's very loosely......

Under$8.00 Servo turnout Control --- 3D Printed Model RR Objects -- My Home Page

http://1fatgmc.com/RailRoad/RR Main/Link Page Menu.html

Sumner

  • Crew
  • *
  • Posts: 525
  • Gender: Male
  • Respect: +1422
    • My Home Pages....
Re: UP's N Scale Canyon Division Layout Build....
« Reply #55 on: April 22, 2025, 01:52:43 PM »
+4
Scenery to Track Elevator – Part 9 and  UP’s Coal Mine Entrance....

Pretty much finished painting the area that I’ve added the foam board to. Need to landscape next to the upper level tracks after they are in.


.


 I took some sandstone that is local to the area I’m modeling and broke it up with a hammer to see what it would look like as boulders. The paver sand is about 1.5 N scale inches in diameter and larger.


Above is where I left off about a year ago.


.


Made two full size templates, one on the layout and the other to use for measurements and rough angles designing with Fusion.


Love Fusion and how easy and fast it is to do something like this.


Love my resin printer but still use the Ender 3 Pro a lot, especially for a project like this.


The mine building in the image was all printed with the Ender 3 Pro.  I'll print some detail for it with the resin printer.


.


More info on the coal mine ( HERE ) .

…..To be continued…....

A link to this whole build ( HERE ) .

Sumner
« Last Edit: April 23, 2025, 11:11:44 AM by Sumner »
Working in N Scale ---Modeling UP from late 40's to early 70's very loosely......

Under$8.00 Servo turnout Control --- 3D Printed Model RR Objects -- My Home Page

http://1fatgmc.com/RailRoad/RR Main/Link Page Menu.html

Sumner

  • Crew
  • *
  • Posts: 525
  • Gender: Male
  • Respect: +1422
    • My Home Pages....
Re: UP's N Scale Canyon Division Layout Build....
« Reply #56 on: April 28, 2025, 12:03:38 PM »
+5
Scenery by Coal Mine Part 2...

Continuing on with the rock face by the coal mine.


.


.


.


.


.   


.


.   


More info on the coal mine ( HERE ).

…..To be continued…

.... A link to this whole build ( HERE ).

Sumner
Working in N Scale ---Modeling UP from late 40's to early 70's very loosely......

Under$8.00 Servo turnout Control --- 3D Printed Model RR Objects -- My Home Page

http://1fatgmc.com/RailRoad/RR Main/Link Page Menu.html

Sumner

  • Crew
  • *
  • Posts: 525
  • Gender: Male
  • Respect: +1422
    • My Home Pages....
Re: UP's N Scale Canyon Division Layout Build....
« Reply #57 on: April 29, 2025, 11:26:20 AM »
+4
Finished most of the foam board work by the coal mine....


The geology in SE Utah, where I live, is quite a bit more complex/complicated than what I can show with a small layout. I’m showing a lot of red-rock but really less than 2 scale miles of it total on the layout. I wanted the coal mine and in this area the coal seams are in formations above the red-rock formations. In the area of the coal mine I created a dip in the formations to show both the red-rock and the coal seams in close proximity to each other.


My railroad is of course 95% fictitious as UP never really penetrated the area’s red-rock country very far although ….


…. they do have a branch line that shows what could have been if they had gone further. Click ( HERE ) for a great video of this branch line and there are more on YouTube.

More info on the coal mine ( HERE ). …..

To be continued…....

Sumner
Working in N Scale ---Modeling UP from late 40's to early 70's very loosely......

Under$8.00 Servo turnout Control --- 3D Printed Model RR Objects -- My Home Page

http://1fatgmc.com/RailRoad/RR Main/Link Page Menu.html

Sumner

  • Crew
  • *
  • Posts: 525
  • Gender: Male
  • Respect: +1422
    • My Home Pages....
Re: UP's N Scale Canyon Division Layout Build....
« Reply #58 on: May 02, 2025, 07:50:52 PM »
+4
I've been working on the scenery on my N Scale layout for the past month and a half between the coal mine complex and the track elevator.


Above the video shows the area that I've been working on and also a short track elevator demo.

The layout build is documented ( HERE ) .

Sumner
Working in N Scale ---Modeling UP from late 40's to early 70's very loosely......

Under$8.00 Servo turnout Control --- 3D Printed Model RR Objects -- My Home Page

http://1fatgmc.com/RailRoad/RR Main/Link Page Menu.html

Sumner

  • Crew
  • *
  • Posts: 525
  • Gender: Male
  • Respect: +1422
    • My Home Pages....
Re: UP's N Scale Canyon Division Layout Build....
« Reply #59 on: May 08, 2025, 02:37:17 PM »
+4
Scenery by Coal Mine Part 3....

Continuing on …....


…..To be continued…....

A link to this whole build ( HERE ) .

Sumner
Working in N Scale ---Modeling UP from late 40's to early 70's very loosely......

Under$8.00 Servo turnout Control --- 3D Printed Model RR Objects -- My Home Page

http://1fatgmc.com/RailRoad/RR Main/Link Page Menu.html