Author Topic: UP's N Scale Canyon Division Layout Build....  (Read 5135 times)

0 Members and 1 Guest are viewing this topic.

Sumner

  • Crew
  • *
  • Posts: 448
  • Gender: Male
  • Respect: +1114
    • My Home Pages....
Re: UP's N Scale Canyon Division Layout Build....
« Reply #30 on: February 02, 2025, 10:48:34 AM »
+4
Sawmill Design/Build – Part 26

Continuing with painting the main building interior parts but also...


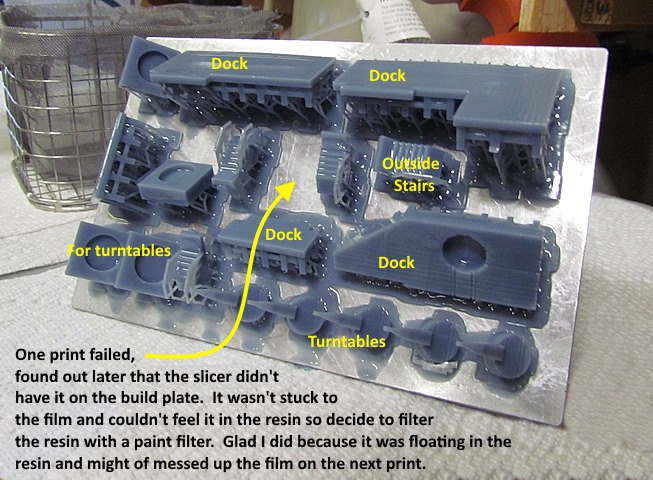
….. had to do a slight redesign of some of the exterior building detail. I’d raised the building a scale foot by putting a perimeter footing around it. That meant that I also had to raise all of the exterior docks and stairs a foot. Did that and then reprinted them. Slight problem when one of the prints didn’t print due to the fact it wasn’t on the build plate (probably my fault). It started printing up in the air off the plate so didn’t stick to the plate.

Presented some confusion as I couldn’t figure out where it went or what happened. Normally a failed print ends up stuck to the film on the bottom of the resin since they fail somewhere after the print starts. I ran my silicon spatula all around in the resin and on the film and couldn’t feel anything so almost went on to the next print. Glad I didn’t and took the time to filter the resin through a paint filter and found the failed part. If I would of gone on the build plate could of come down on the next print and pressed the failed print into the FEP film and maybe ruptured it. If you don’t have them maybe consider spending under $10 for 100 paint filters.


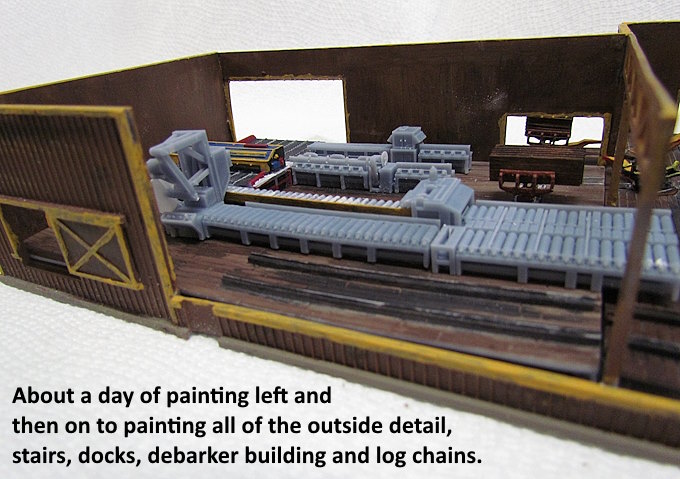
I’m using my smallest brush (very few fibers) and it works but these parts are really small and painting detail down to under .010” (.25mm) is challenging but I enjoy it and accept some errors. Also find that the more I do of this that it seems my 80+ year old hands shake less. I think it is having to relearn muscle memory that I’ve lost.


.


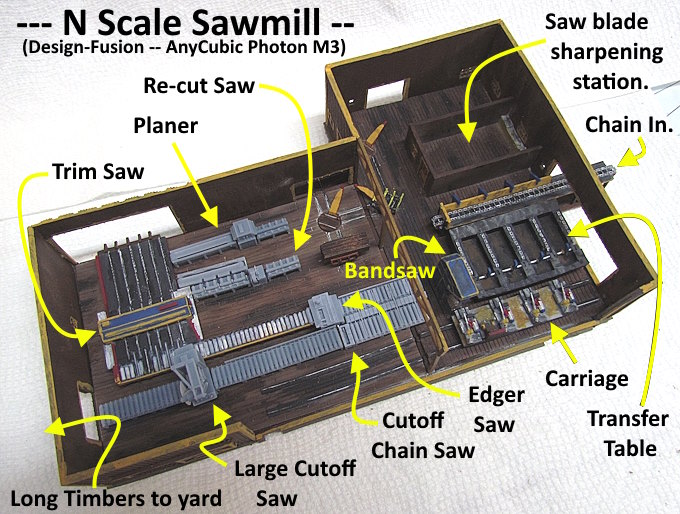
I hadn’t left the proper depth for the holes for the turntables above to rotate in so fixed the print that I’ll post the files for but didn’t want to reprint the two floors so cut the holes out and printed capture pieces that I glued under the floors for the turntables to sit in. The turntables are there to move carts with lumber loads into the mill from the dock just outside to the planer and re-cut saw.

The turntables allow for more than one cart to be involved as an empty cart can continue around the track and back to the dock without interfering with another cart. They are turned by hand.

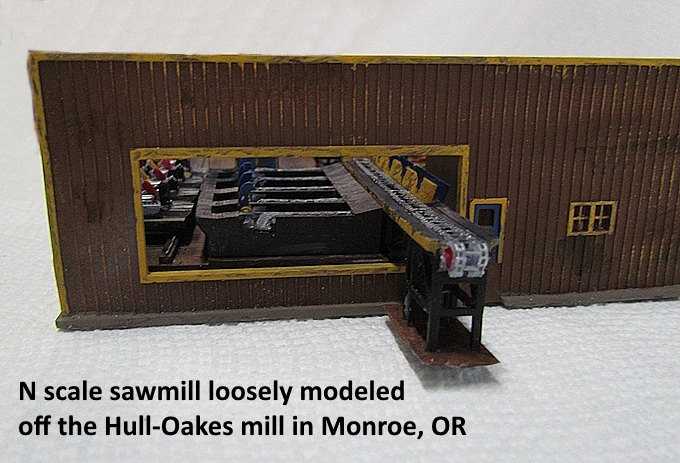
The Hull-Oakes mill who I used to some degree for this project doesn’t have them I did see on another HO scale mill where carts were used somewhat like this to move loads out of the mill to either be dried, shipped or planed. I thought this added more interest to the mill but have no idea if it has ever been used like this (my mill, my mill plan is/was my plan).


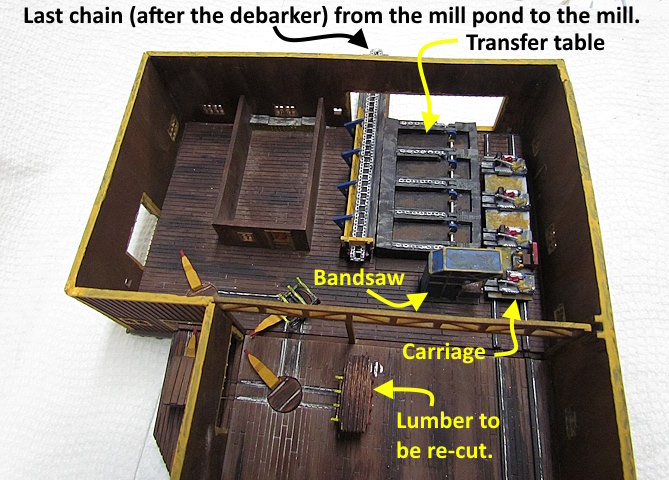
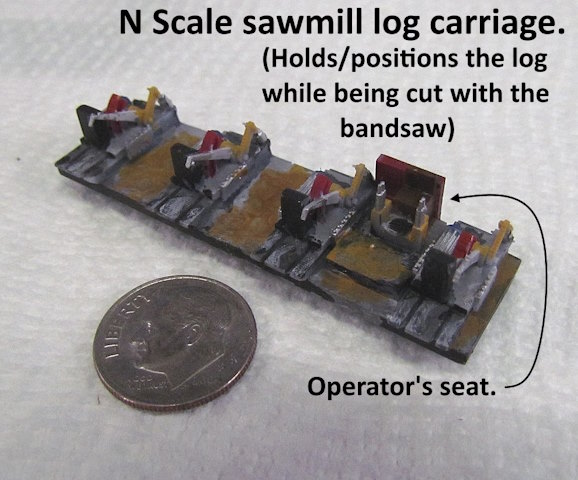
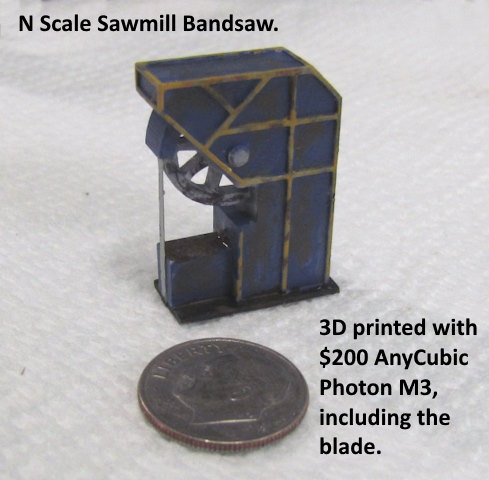
I painted all the equipment needed to get the log in and cut into a slab. The chain in, transfer table, log carriage and bandsaw are show above.


Next up is painting the printed parts shown above that are still grey.


The logs travel from the mill pond to the mill on 4 different chains. There is a log lift that lifts the log out of the mill pond to the first chain and then moves the log to a chain going into the debarker building. There a chain moves the log into the debarker which obviously removes the bark as the log goes through it. On the other side of the debarker a chain moves the log along to the chain show above which moves it into the mill. At the end of that chain….


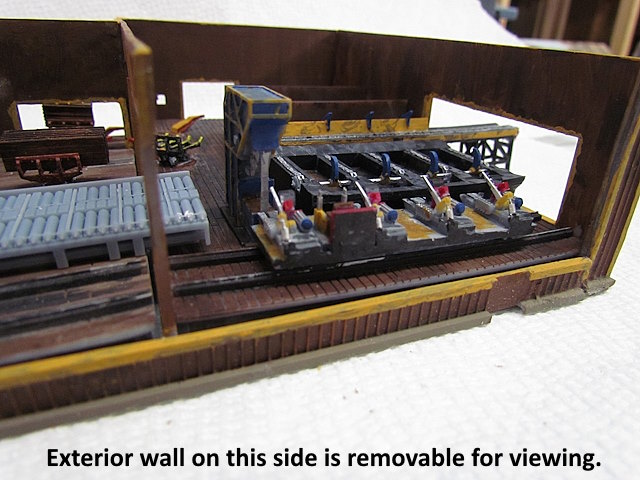
…. there are some paws (blue and visible in the back of the image above) that push the log onto the transfer table. There can be numerous logs on the table. The table has a mechanism that moves only one log at a time onto the log carriage. The carriage holds the log while the carriage passes the bandsaw and cuts a slab off. The the carriage moves the log towards the band saw for the next cut. The log can also be rotated 90 degrees at a time on the carriage to make additional cuts for either a large timber or to be cut into dimensional lumber.


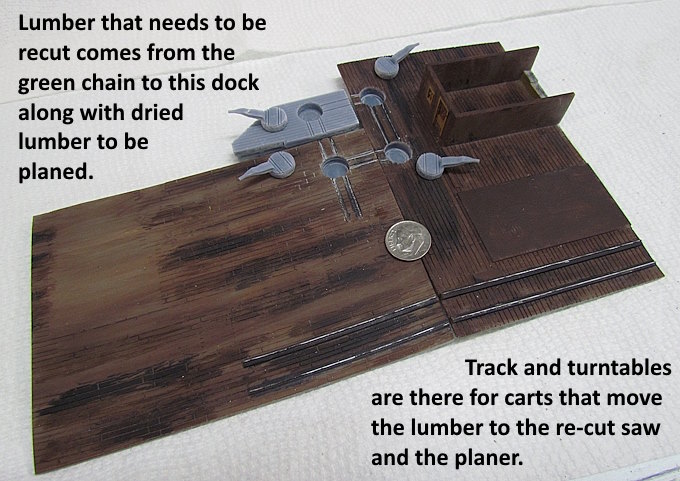
Above one can see how the lumber that needs to be re-cut can move in by the re-cut saw. The next load on the dock is air dried lumber that will come in and be run through the planer (machine closest to the wall).

In the foreground when a slab is cut off the log by the bandsaw (barely visible on the right) the slab falls on the nearest set of rollers. It it is shot enough it moves over to the next set of rollers via the chain and the slab moves through the edger saw which cuts the rough edges off the slab creating a board of the width the edger is set for (different for different width slabs).

If the slab is too long to move over it moves down the rollers some and a chain saw comes up out of the hole on this side of the edger saw and cuts the slab into a shorter length. The one piece moves over to the edger rollers and is cut. The other piece that was cut moves back up the rollers towards the band saw and it moves over to the edger rollers and is cut.

A long timber that wouldn’t go through the edger is moved off the carriage onto the first set of rollers and …


….. moves on down them to the large cutoff saw shown on the left end of those rollers. It is cut to length and moves out of the mill to be stored in the yard.

The boards that were cut by the edger move on down to the end of that set of rollers. There chains move the board over onto a table and another set of chains that move the board through the trim saw that can cut the board to different lengths. Those boards then move out to the green chain to be sorted.

They are also inspected and any that need to be re-cut to a shorter length due to a defect move back over to the dock where they are place on carts that take the to the re-cut saw. From the re-cut saw or the planner they are moved by conveyor belts back onto the chains after the trim saw and move back to the green chain for final sorting.

That is the workflow for this mill others are probably somewhat similar or might add a step or do and not follow all of those steps.

.... to be continued.

=========================================

A link to this whole build ( HERE ).

Sumner
Working in N Scale ---Modeling UP from late 40's to early 70's very loosely......

Under$8.00 Servo turnout Control --- 3D Printed Model RR Objects -- My Home Page

http://1fatgmc.com/RailRoad/RR Main/Link Page Menu.html

Sumner

  • Crew
  • *
  • Posts: 448
  • Gender: Male
  • Respect: +1114
    • My Home Pages....
Re: UP's N Scale Canyon Division Layout Build....
« Reply #31 on: February 03, 2025, 04:52:37 PM »
+3
Sawmill Design/Build – Part 27 (Link to the print files);

You can find the print files on my thingiverse.com account ( HERE ).

If you take on this build keep in mind that this isn’t a commercial kit and you will end up doing some filing and fitting of parts. It is not a ‘snap-together’ kit. I could probably redesign some parts to work better but I’ve got what I need and no one is paying me anything and very few supporting the project so I’ll be moving on but you can see that it is possible to construct this if one takes their time.

The print files that are in this group for the sawmill constitute the exterior walls the two floor sections and also 3 floor supports. The following are pictures to help visualize putting the building together with this group of files.


.


.


.


.


The following images should show you where the different print files go.


.


.


.


.


   .

You can find the print files on my thingiverse.com account ( HERE ).

.... to be continued.

=========================================

A link to this whole build ( HERE ).

Sumner
Working in N Scale ---Modeling UP from late 40's to early 70's very loosely......

Under$8.00 Servo turnout Control --- 3D Printed Model RR Objects -- My Home Page

http://1fatgmc.com/RailRoad/RR Main/Link Page Menu.html

Sumner

  • Crew
  • *
  • Posts: 448
  • Gender: Male
  • Respect: +1114
    • My Home Pages....
Re: UP's N Scale Canyon Division Layout Build....
« Reply #32 on: February 16, 2025, 07:57:39 PM »
+3
After being sidetracked got back to painting some of the sawmill interior detail.  I can do this for about 2 hours max and then need to take a break.


Painted the docks and exterior stairs about a week ago and today ....


.... painted the recut saw and the planer station.

Lumber that goes down the green chain and which has defects gets pulled from the green chain and sent back into the mill to be recut.  It comes off the saw and the conveyor belt shoots it back on the chain between the trim saw and the green chain where it moves back to the green chain for sorting.

Lumber that is to be planed moves from the green chain to air dry in the yard.  When ready it goes back into the mill and run through the planer and then also back to the green chain for sorting.

Sumner
Working in N Scale ---Modeling UP from late 40's to early 70's very loosely......

Under$8.00 Servo turnout Control --- 3D Printed Model RR Objects -- My Home Page

http://1fatgmc.com/RailRoad/RR Main/Link Page Menu.html

Sumner

  • Crew
  • *
  • Posts: 448
  • Gender: Male
  • Respect: +1114
    • My Home Pages....
Re: UP's N Scale Canyon Division Layout Build....
« Reply #33 on: February 21, 2025, 12:30:03 PM »
+3
I'll try and get the print files up for the docks and stairs below over the weekend.


Sumner
Working in N Scale ---Modeling UP from late 40's to early 70's very loosely......

Under$8.00 Servo turnout Control --- 3D Printed Model RR Objects -- My Home Page

http://1fatgmc.com/RailRoad/RR Main/Link Page Menu.html

Sumner

  • Crew
  • *
  • Posts: 448
  • Gender: Male
  • Respect: +1114
    • My Home Pages....
Re: UP's N Scale Canyon Division Layout Build....
« Reply #34 on: February 22, 2025, 09:54:17 AM »
+3
The following are the remainder of the interior machinery parts. These items are really small and some detail is there but basically too small to paint or see. For instance the pillow blocks for the rollers and the belts between the rollers print but are very hard to actually see even up close. The printers now are better at detail than what our eyes can see, at least mine.


.


It took me a while watching videos to see how they handle slabs that are way too long to transfer over to the edger saw. The slabs move down the rollers towards the timber cutoff saw until the end of the slab is even with the end of the transfer table over to the edger rollers and saw. A chain saw comes up out of a slot and cuts the slab into two pieces. The one piece next to the transfer table is transferred over to the edger by the four chains that you can see above. Then the rollers down towards the timber cutoff saw reverse and bring the other half of the slab back up along side the transfer table. Then the chains move that slab over to the edger rollers and it moves through the edger which cuts it to width.


.


The cutoff saw isn’t an exact model of the one that the Hull-Oakes mill has. That goes for the rest of the equipment. I tried to ‘kind of’ replicate it to fit the scene and give a sense of the work flow of the mill.


I’ll do an overview of the interior machinery on the next page and then also post a link to the print files for the interior machinery. The painting went fairly fast. I probably have 6-7 hours of painting for the interior machinery past the main band saw and an other couple for the machinery into the mill and to the bandsaw and the saw itself.

 .... to be continued.

=========================================

A link to this whole build ( HERE ).

Sumner
Working in N Scale ---Modeling UP from late 40's to early 70's very loosely......

Under$8.00 Servo turnout Control --- 3D Printed Model RR Objects -- My Home Page

http://1fatgmc.com/RailRoad/RR Main/Link Page Menu.html

wazzou

  • Crew
  • *
  • Posts: 6780
  • #GoCougs
  • Respect: +1713
Re: UP's N Scale Canyon Division Layout Build....
« Reply #35 on: February 22, 2025, 05:08:05 PM »
0
Did you ever link specifically to the green chain file?
Bryan

Member of NPRHA, Modeling Committee Member
http://www.nprha.org/
Member of MRHA


Sumner

  • Crew
  • *
  • Posts: 448
  • Gender: Male
  • Respect: +1114
    • My Home Pages....
Re: UP's N Scale Canyon Division Layout Build....
« Reply #36 on: February 22, 2025, 07:08:51 PM »
+3
Working in N Scale ---Modeling UP from late 40's to early 70's very loosely......

Under$8.00 Servo turnout Control --- 3D Printed Model RR Objects -- My Home Page

http://1fatgmc.com/RailRoad/RR Main/Link Page Menu.html

Sumner

  • Crew
  • *
  • Posts: 448
  • Gender: Male
  • Respect: +1114
    • My Home Pages....
Re: UP's N Scale Canyon Division Layout Build....
« Reply #37 on: February 23, 2025, 06:24:32 PM »
+2
Sawmill Exterior Stairs & Dock Print Files....

You can find the print files for the 'Stairs & Docks’ on thingiverse  ( HERE ).

=========================================

To see/download the print files go to the link above or at the bottom of this page The following images show you the number of the print files and where they are located on the building. The print file names start with these numbers followed by a description of where they are located.


.


.


.


.


.


Above some of the stairs and docks are shown on the printer’s build plate.

.... to be continued.

=========================================

You can find the print files for the 'Stairs & Docks’ on thingiverse  ( HERE ).

=========================================

A link to this whole build ( ( HERE ) ).

Sumner
Working in N Scale ---Modeling UP from late 40's to early 70's very loosely......

Under$8.00 Servo turnout Control --- 3D Printed Model RR Objects -- My Home Page

http://1fatgmc.com/RailRoad/RR Main/Link Page Menu.html

Sumner

  • Crew
  • *
  • Posts: 448
  • Gender: Male
  • Respect: +1114
    • My Home Pages....
Re: UP's N Scale Canyon Division Layout Build....
« Reply #38 on: February 24, 2025, 06:15:23 PM »
+2
Interior Machinery Print Files...

You can find the print files for the 'Interior Machinery’ on thingiverse ( HERE ).

 =========================================

To see/download the print files go to the link above or at the bottom of this page The following images show you the number of the print files and where they are located in the building. The print file names start with these numbers followed by a description of where they are located.

The print files for the machinery in the north part of the building are ( HERE ).


.


.


.


.   


.


.


.


.   


.


 .... to be continued.

=========================================

You can find the print files for the 'Interior Machinery’ on thingiverse ( HERE ).

 =========================================

A link to this whole build ( HERE ).

Sumner
Working in N Scale ---Modeling UP from late 40's to early 70's very loosely......

Under$8.00 Servo turnout Control --- 3D Printed Model RR Objects -- My Home Page

http://1fatgmc.com/RailRoad/RR Main/Link Page Menu.html

Sumner

  • Crew
  • *
  • Posts: 448
  • Gender: Male
  • Respect: +1114
    • My Home Pages....
Re: UP's N Scale Canyon Division Layout Build....
« Reply #39 on: February 26, 2025, 07:31:52 PM »
+2
Sawmill Design/Build – Part 31...

=========================================

You can find the print files for the 'Roof’ on thingiverse ( HERE ).

=========================================

To see/download the print files go to the link above or at the bottom of this page.


I had to do some file work on the bottom of the gables to get them to sit flat on the tops of the walls. If you download the print files keep in mind that this isn’t a commercial kit and you didn’t pay for it so expect some filing and fitting of pieces. I need to move onto other projects and have already spent way too much time on this so some of the print files maybe could be worked on and modified but not by me ;-).


With all of the interior detail in, used small pieces of double-sided tape, I glued the gables in place. I’ll add more small miscellaneous detail once I’m ready to put the mill on the layout.


Above are the file numbers for the gables.


I feel I need to tone the roof down more.


I find that some prints that end up warping can be fixed with the heat-gun and then hold them in place overnight.


I won’t glue the roof structure to the mill building itself.


This has been a long build with lots of hours designing, printing prints I didn’t like. Redesigning and reprinted them and then documenting it all.


.


.     


I need to paint the pond log-lift and chain and the debarker building, debarker and chain and then will finally move onto something else. I have lots of backed up projects.

=========================================

You can find the print files for the ‘Roof’ on thingiverse ( HERE ).

=========================================

A link to this whole build ( HERE ).
Working in N Scale ---Modeling UP from late 40's to early 70's very loosely......

Under$8.00 Servo turnout Control --- 3D Printed Model RR Objects -- My Home Page

http://1fatgmc.com/RailRoad/RR Main/Link Page Menu.html

Sumner

  • Crew
  • *
  • Posts: 448
  • Gender: Male
  • Respect: +1114
    • My Home Pages....
Re: UP's N Scale Canyon Division Layout Build....
« Reply #40 on: February 28, 2025, 12:10:29 PM »
+3
I'm finishing up painting the sawmill complex and put up the following pictures of the debarker and debarker building.  More info and print file links to the debarker and building ( HERE )  and ( HERE ) .

The following are pictures after the debarker and building were painted.


.


.


.


.


.


.


.


=======================================================

You can find the print files for the components shown above on my thingiverse.com account ( HERE )

 =======================================================

To be continued............

A link to this whole build ( HERE ) .

Sumner
Working in N Scale ---Modeling UP from late 40's to early 70's very loosely......

Under$8.00 Servo turnout Control --- 3D Printed Model RR Objects -- My Home Page

http://1fatgmc.com/RailRoad/RR Main/Link Page Menu.html

Sumner

  • Crew
  • *
  • Posts: 448
  • Gender: Male
  • Respect: +1114
    • My Home Pages....
Re: UP's N Scale Canyon Division Layout Build....
« Reply #41 on: March 01, 2025, 04:20:21 PM »
+1
Finished painting the rest of the sawmill complex pieces...


... I'll try and get an overview up tomorrow for the whole mill complex.

A link to the log-lift here......

https://1fatgmc.com/RailRoad/UP%20Canyon%20Division/page-218.html

... and the boom boats .................

https://1fatgmc.com/RailRoad/UP%20Canyon%20Division/page-223.html

Sumner
Working in N Scale ---Modeling UP from late 40's to early 70's very loosely......

Under$8.00 Servo turnout Control --- 3D Printed Model RR Objects -- My Home Page

http://1fatgmc.com/RailRoad/RR Main/Link Page Menu.html

Sumner

  • Crew
  • *
  • Posts: 448
  • Gender: Male
  • Respect: +1114
    • My Home Pages....
Re: UP's N Scale Canyon Division Layout Build....
« Reply #42 on: March 04, 2025, 03:52:44 PM »
+5
Sawmill Complex Finished....

After a year of working on this off and on and a few hundred hours I consider the sawmill finished enough to put away until it is time to put it on the layout. This page will be more or less an overview of the near finished build.


The sawmill complex is a little over two feet long and about a foot wide at the green chain end. Also needed is room for the mill pond, air drying yard and a loading facility at the tracks which all take up space. It will occupy the upper level on one end of the layout and will be a scene in its own.


Logs will arrive by rail and truck on the far side of the mill pond (not shown) and be off-loaded there into the pond. A boom boat will then organize the logs and move them onto the log-lift. There will be a second boom boat for the times the other one is out of service for one reason or another. The logs then move along the chain and ….


….. into and through the debarker building where the bark is removed. From there they ….


….. continue on with the chain and into the mill. Once in the mill the paws on the chain push them onto the transfer table. There they stack up and then roll onto the carriage. The carriage takes them back and forth and slabs are cut off on each pass through the bandsaw.


As the carriage passes the band saw a slab is cut off and falls onto the rollers next to the carriage.

If the slab is actually a large timber that won’t be further cut when the carriage pushes it onto the roller it moves to the left down the rollers. A large cutoff saw there cuts it to length. If a slab moves over onto the rollers there are chains there that move it further over to the second set of rollers. The slab then moves through the edger saw and is turned into a board of some width with now straight edges.

The board moves along the rollers past the edger and then is moved over to the table going into the trim saw by a set of chains. The trim saw cuts the board to length with waste coming off both ends. The board then moves along another chain and out onto the ‘green chain’ for sorting.


Above we see the main machinery (some not painted yet). Show is a re-cut saw and a planer. Any lumber that ends up on the green chain that has flaws is brought back into the mill and run through the re-cut saw to remove any damaged ends. Lumber that comes off the green chain and that is to be planed goes to the yard and is air dried. When dry it is brought back into the mill and run through the planner. Lumber from the planer and re-cut saw is shot back onto the chain to the green chain by fast moving conveyor belts.


The numbers above are the numbers of the print files that are all up on my thingiverse account ( HERE ). It is easier though to find them if you go to the menu ( HERE ) for the whole build.

There you will find much more info on each section of the mill along with links for the print files for that part of the mill.


More info on the green chain ( HERE ) and ( HERE). There are some roof options to consider. One can print it as a stand alone green chain with its own roof or you can print the roof to be connected to the main roof of the mill as seen further down the page.


The roof lifts off to view the interior of the mill. Also the …...


…. trusses and post and beams under the green chain roof can lift off also. This brings this build to an end until I have scenery and track finished where the mill will be placed ( HERE ).

A link to this whole build ( HERE ).

Sumner
Working in N Scale ---Modeling UP from late 40's to early 70's very loosely......

Under$8.00 Servo turnout Control --- 3D Printed Model RR Objects -- My Home Page

http://1fatgmc.com/RailRoad/RR Main/Link Page Menu.html

Sumner

  • Crew
  • *
  • Posts: 448
  • Gender: Male
  • Respect: +1114
    • My Home Pages....
Re: UP's N Scale Canyon Division Layout Build....
« Reply #43 on: March 20, 2025, 11:38:00 AM »
0
Scenery to Track Elevator – Part 1......

Finally after months of CAD, 3D printing and Electronics projects I’m back actually doing something constructive on the layout. Before laying more track I want to finish (mostly) scenery in harder to reach places so that I’m not doing the work over track that has been laid. Would really like to get that done on the south side of the layout where there will be the edge of a small town and my coal mine complex. Other than that it will be mostly scenery on the upper and lower levels of the layout.

So that begins……...


To be continued…....

A link to this whole build ( HERE ) .

Sumner
« Last Edit: March 20, 2025, 11:39:31 AM by Sumner »
Working in N Scale ---Modeling UP from late 40's to early 70's very loosely......

Under$8.00 Servo turnout Control --- 3D Printed Model RR Objects -- My Home Page

http://1fatgmc.com/RailRoad/RR Main/Link Page Menu.html