Author Topic: Wellsville Addison & Galeton in 1:29: Shortline Road Switching Layout Outdoors  (Read 6346 times)

0 Members and 1 Guest are viewing this topic.

TiogaTracks

  • Crew
  • *
  • Posts: 153
  • Respect: +422
This week was a big week for the layout!  Facing a deadline, I put every free minute I could into layout construction, and while I fell short of my original goal, I still loved the busy week and was proud of what I had to show for it.

As part of a local railroad history conference, a neighbor and fellow model railroader was inviting a group of local rail history lovers over for a cookout, and wanted them to see my project.  I decided to get it finished enough to run a train, but to do that, I would have to build the ENTIRE raised bed garden, AND lay the track, AND wire it up.

I started the week’s work last Saturday, with an outline of the future garden walls drawn in dirt, and only a handful of cinder blocks to work with.  By Sunday, I placed the first few:

[ Guests cannot view attachments ]

Tuesday saw a bit more of the same:

[ Guests cannot view attachments ]

By the end of Tuesday, this is what I had done, and I again ran out of blocks.  This day’s work included carefully digging, placing, and leveling some shorter solid blocks to fill in a low spot.

[ Guests cannot view attachments ]

But thanks to some family help and the good old parental pickup truck service, I had plenty of blocks to place Wednesday.  Adding two courses of blocks stop the solid block foundation looked great!  And once I used matching bricks to fill in the wide gaps between the blocks on the outer edge of the curve, it looked even greater:

[ Guests cannot view attachments ]

I worked well past dark, using the same photo floodlights I originally got for taking product photos during my high school and college days writing for Model Railroad News.  The pace of progress was increasing rapidly!

[ Guests cannot view attachments ]

By Thursday, pretty much all the materials were on hand, totaling 75 oversized cinder blocks, about 2 dozen solid foundation blocks, and around 80 brick red capstones.  5 tons of gravel had been delivered, and I still need more.

[ Guests cannot view attachments ]

Friday was my deadline, the cookout would start around 6.  I had to borrow some capstone blocks, leaving gaps, but I could lay the entire loop on the raised bed garden.  I moved three or four wheelbarrow loads of sod and dirt that day, to finish rough grading of the straight track between the loops.  I recycled some 4-conductor phone cable and some 2-wire alligator clip test leads to temporarily wire up the railroad with DCC power through 3 feeders, but no auto reversing.  As I went in and out of the house, I always brought 2-4 train cars out with me all afternoon.  By cookout time, I had just connected the two loops, and the old Wellsboro Junction loop was packed full of trains.

[ Guests cannot view attachments ]

I made it to the cookout just a little late, and we decided to start the evening with the tour of my layout.  I switched the trains around to put all 17 cars and the caboose behind U25b 2504.  After a little oops where I ran the wrong way through the loop switch and nearly clipped my own caboose, I backed the train clear, my neighbor threw the switch, and 2504 led the very first train down the length of my garden railroad.

The train arrived at the new raised bed garden loop without incident, and unsurprisingly lost electric contact on the bridge (probably gravel dust all over the railheads).  I knew it was going to stall soon for lack of another feeder wire in the isolated reverse loop section, so I count that as a win.  It wasn’t done, but it DID run!  Here’s the train after that first run.

[ Guests cannot view attachments ]

I’m excited to continue making progress!  Next steps are to design the staging yard atop the raised bed garden, fill in the garden bed, lay the yard, and begin permanent wiring in conduit.  Dare I hope I can have the railroad operating as designed by next weekend?  Either way, I think I’ll enjoy the next steps of the construction journey!

-Steven

« Last Edit: August 14, 2022, 11:12:29 PM by TiogaTracks »
Wellsville Addison & Galeton RR in 1:29
Still dabbling in N scale
Restoring a full size 1951 Brill bus

TiogaTracks

  • Crew
  • *
  • Posts: 153
  • Respect: +422
The sudden transformations of last week have given way to slower, sometimes invisible improvements.  The garden bed hosting Penn Central’s staging yard will require one more delivery of gravel to complete, but it’s looking better and better.  And the first continuous run of the roughly 240-foot dogbone loop happened!

Here’s my test vehicle, the motorized toy trolley.  Its onboard battery let me skip waiting for the reverse loop controllers!

[ Guests cannot view attachments ]

I was able to get a dozen more tan capstones, so I’ve gotten to work re-laying the top layer of the garden walls.  Also, I planted the first herbs and decorative plants in the garden a bit over a week ago.

[ Guests cannot view attachments ]

[ Guests cannot view attachments ]

Operations planning is going on also.  I took this beauty shot to help get more eyes on a question I posted to a social media group about the prototype.

[ Guests cannot view attachments ]

I don’t think I’ll get to the point of actually interchanging cars this year, but I’ll enjoy just running trains for now.  There will be ample buildings, locomotives, cars, and even historical paperwork to work on over the colder months.  And next year ought to bring great things!

-Steven
« Last Edit: August 24, 2022, 08:53:11 PM by TiogaTracks »
Wellsville Addison & Galeton RR in 1:29
Still dabbling in N scale
Restoring a full size 1951 Brill bus

Ed Kapuscinski

  • Global Moderator
  • Crew
  • *
  • Posts: 24057
  • Head Kino
  • Respect: +7940
    • Conrail 1285
So I forget, where in the world are you located again?

TiogaTracks

  • Crew
  • *
  • Posts: 153
  • Respect: +422
So I forget, where in the world are you located again?

Not far from my prototype’s home turf, Tioga County, PA.  It’s a shame not too much is left to see if the railroad in person, but thankfully there are a few people who know where to find what remains.

-Steven
Wellsville Addison & Galeton RR in 1:29
Still dabbling in N scale
Restoring a full size 1951 Brill bus

TiogaTracks

  • Crew
  • *
  • Posts: 153
  • Respect: +422
+2
Progress has been a winding road this past week.  Need to wire the railroad, so need to install reverse loop controllers (NCE’s AR10 module), so need to build something to protect them outside… so time to do some structure modeling!  But wait, I have this set of windows set aside to build the little station at Gaines with… better do that first, THEN do the freelance structures to protect the auto-reversers.  It makes sense, I swear!

I don’t know when I last scratchbuilt anything, let alone a structure, so I started simple with the clapboard sided Gaines station.  It’s simply JTT and Evergreen styrene with vacu-formed windows and doors.  I still need to figure out the roof, but the important part was picking out doors and windows that fit the look.

[ Guests cannot view attachments ]

[ Guests cannot view attachments ]
Needs much more work, but it should turn out well.


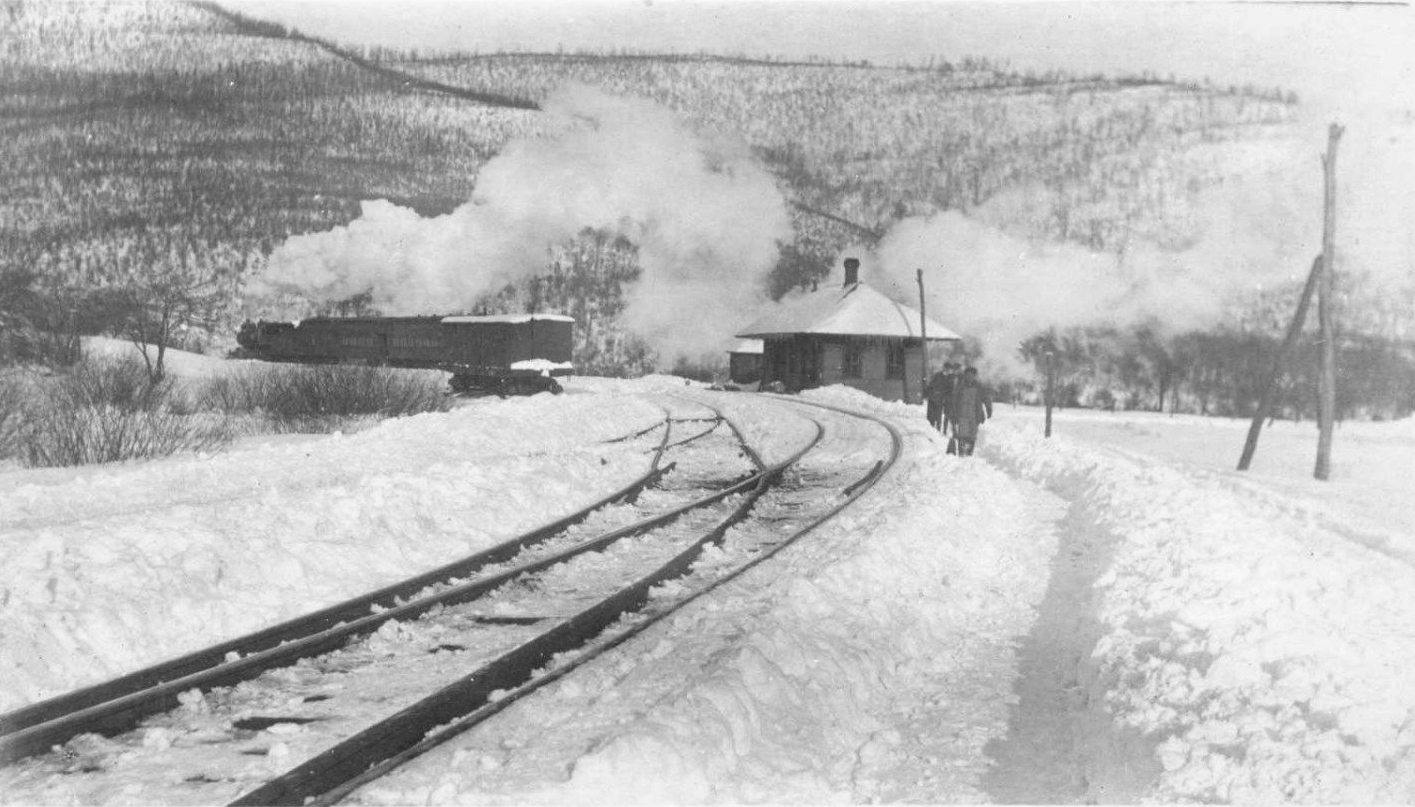
This is the station long before my era.  Windows got removed over time, and the platform vanished after passenger service ended in the late 1940s.

With that distraction at a good pausing point, I dove into the two structures to protect the auto reversers.  One would be at the edge of a staging yard, so a small tower is in order.  The other is in the middle of nowhere next to a switch.  So, I went for a signal equipment shed look.  A bit of JTT corrugated siding and a flat roof are all I used.

[ Guests cannot view attachments ]

Then I got to work weathering it with rust-colored spray paint.

A fine mist of orange:
[ Guests cannot view attachments ]

Holding the can closer and making the nozzle spit unevenly to get larger uneven spots:
[ Guests cannot view attachments ]

Some fine mist and larger spots of a darker red:
[ Guests cannot view attachments ]

More red and orange spots, brushed downward to imply streaks:
[ Guests cannot view attachments ]

And now we’ve taken the structure from this:


To this:
[ Guests cannot view attachments ]

The whole idea is that the shack can be screwed down to this outlet box which I sealed up and installed pipe connections in.  Old garden hose will serve as conduit for the wiring, and this signal shanty will be both an auto reverser and a junction box.
[ Guests cannot view attachments ]

I put it where it will go, and it should look great and provide a good sealed home for the electronics.
[ Guests cannot view attachments ]

I hope to get the tower done while it’s raining the next couple days, and get the railroad ready for continuous running on DCC this coming week!

-Steven
« Last Edit: September 04, 2022, 01:15:00 PM by TiogaTracks »
Wellsville Addison & Galeton RR in 1:29
Still dabbling in N scale
Restoring a full size 1951 Brill bus