Author Topic: Milwaukee Road VO1000 #935  (Read 1616 times)

0 Members and 1 Guest are viewing this topic.

milw12

  • Crew
  • *
  • Posts: 372
  • Respect: +319
Milwaukee Road VO1000 #935
« on: December 04, 2021, 06:24:49 PM »
+7
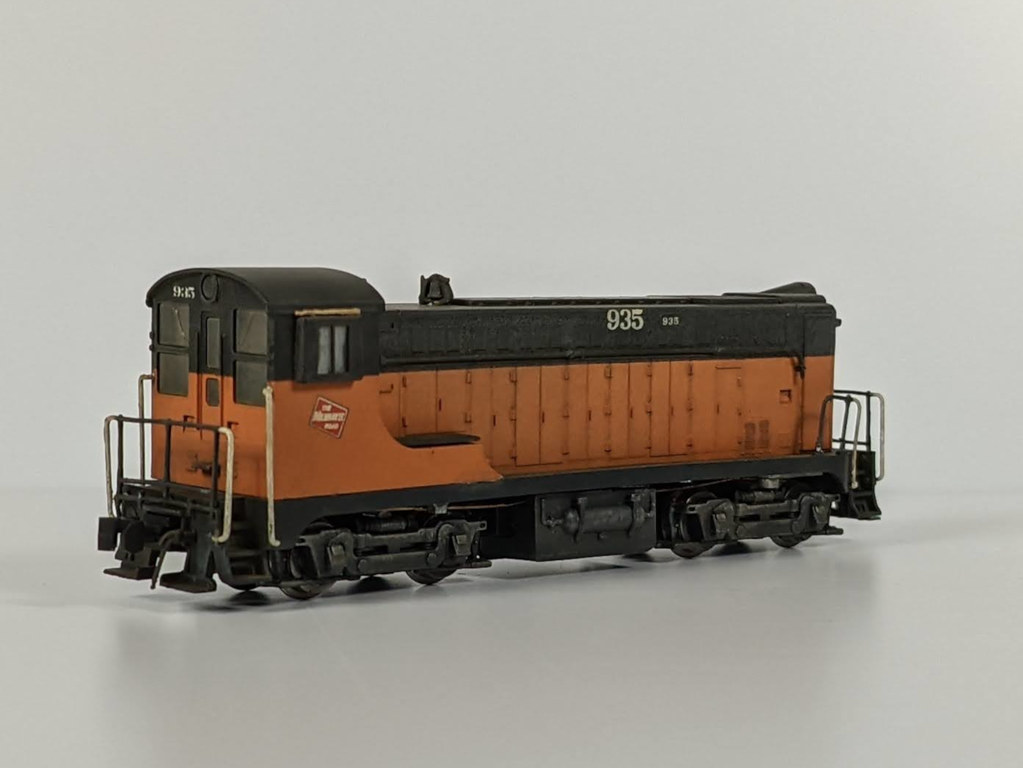
Recently I've finished my first successful locomotive weathering project, Milwaukee Road VO-1000 #935 in N scale.

This started as a collaborative project between @Bryn and myself during lock down, as we both found we had the same unit, but separated by the Atlantic, and agreed that it'd be a fun little project.


A little background:

935 was the second number for Baldwin VO1000 1687. I could find no known images of this locomotive (it allegedly blew a crankshaft in 1965 and was scrapped early), but sister 933 is documented on page 41 of J. Micheal Gruber's Diesels of the Milwaukee Road Volume 1. Given the quirks of Baldwins, different orders of the same model have different features (but not quite as official as EMD 'phases'). 933 and 935 were part of the third order by the railroad for these locomotives in 1944, so they should be similar. But until images surface I can't be proven wrong ;)

One major spotting feature is the sill step. The Atlas orange/black Milwaukee models from 2002 have squared sill steps, regardless of road number. These are appropriate for the locomotives of the fourth and final order locomotives 936-939 (and these units also had 4 exhaust stacks instead of one). 935, being earlier, should have the stylish rounded "fillet" step, which Atlas has used on more recent VO releases.

So fixing the cab: the initial attempt was an etched fillet but it was deemed unsatisfactory. Undercoated filleted cabs were then ordered from Atlas, and the hood of my unit and the new cabs were mailed overseas to be paint matched and decaled by Bryn, of master-modeler caliber.

After the cab, details required for the unit per sister-933 were GMM all-weather windows (I struggled with these, Bryn graciously bent one with his fancy parallel action pliers), a Miniatures by Eric steam bell, BLMA airline hoses, canvas radiator covers and canvas shade covers over the cab windows (Bigelow black tea bags with a bit of .008 wire and Vallejo Iraqui Sand paint worked well for this). A benefit of the cross-seas nature of the project is that I was able to source detail parts not commonly found in  the UK for Bryn. And given that I'm not handy with an airbrush, it's a task I was happy to do!

Next was weathering, ending up as a mixture of techniques, under Bryn experienced guidance and his recommended youtube tutorials (links at the bottom). Oils were the start over a clear satin coat, light cadmium yellow was used to fade the orange, Paynes grey on the black. A burnt umber and black wash add oily grunge to the walkways and steps. A burnt umber pinwash wash was then applied to the doors and louvers.

The fuel tanks and trucks are brushed Vallejo Model acrylics, Black Grey as a base, Neutral Grey, Burnt Umber and Iraqi Sand as drybrushes, using a black wash to tie it back together.

This was followed by a matte coat, more detailing and matching, the an application of burnt umber, black and grey Pan Pastels. Then final detailing, a final matte coat, and a heavy application of Pan Pastels, mostly burnt umber.

In simple terms, oils, acrylics, matte, powders.

The goal was that of a model of an everyday workingman locomotive and I feel quite happy with the results. There a few noticeable beginners mistakes of my own infliction, wayward glue, paint issues, flat coat orange peel on one side and I'm having a hell of a time with the short handrails on the front end- but I've accepted these as experiences to learn from.

It has been an incredibly satisfying project and one I'm glad we took up. Bryn's guidance kept me at it and on the straight an narrow, and was the push for me to keep at it. Without his experience and abilities this project would have never made it far-  and I'm already eyeballing the next two locomotives on the weathering queue :)

More images will follow, including in progress shots and some working ones. Thanks for looking,

Lucas

Oil weathering tutorials:

https://www.youtube.com/watch?v=B11mAJGwt7I

https://www.youtube.com/watch?v=pl4kZW-e2dM
« Last Edit: December 05, 2021, 08:31:45 PM by milw12 »

wazzou

  • Crew
  • *
  • Posts: 6635
  • #GoCougs
  • Respect: +1569
Re: Milwaukee Road VO1000 #935
« Reply #1 on: December 04, 2021, 06:46:17 PM »
+1
Looks really nice but unfortunately, through no fault of your own, highlights a major deficiency of these models in the very shallow relief of the air/fuel tanks.
Bryan

Member of NPRHA, Modeling Committee Member
http://www.nprha.org/
Member of MRHA


milw12

  • Crew
  • *
  • Posts: 372
  • Respect: +319
Re: Milwaukee Road VO1000 #935
« Reply #2 on: December 04, 2021, 06:48:27 PM »
+3
Back from her overseas tour: satin coat 935 poses with my one weathered caboose:


Funny that a model is more well traveled than I  :scared:

Fade before and after. This was incredibly nerve-wracking, and I'd be lying if I didn't say I procrastinated on this for over six months:


Crummy image from the start of the project, looks like that handrail has been a hell-raiser from the start:


I should note that this model came with an Ajin-Korea drive from the first release. It was replaced with a newer-release Chinese chassis and fitted with a TCS board. Some info on Ajin/China differences on Spookshow's VO page: http://www.spookshow.net/loco/atlasvo1000.html . The shell did was modified per page two of this Atlas document: https://download.atlasrr.com/pdf/Instructions/VO-1000%20Upgrade1.pdf. Excess grease was cleaned from the mechanism during the project. The slow speed is a dream on a ProtoThrottle, and it is among one of my finest runners.

Lucas

milw12

  • Crew
  • *
  • Posts: 372
  • Respect: +319
Re: Milwaukee Road VO1000 #935
« Reply #3 on: December 04, 2021, 06:56:19 PM »
0
Looks really nice but unfortunately, through no fault of your own, highlights a major deficiency of these models in the very shallow relief of the air/fuel tanks.

Wazzou, thanks for the kind words- and I agree, that fuel/air tanks leave much to be desired:

http://www.rrpicturearchives.net/showPicture.aspx?id=4635516

http://www.rrpicturearchives.net/showPicture.aspx?id=101547

Wonder if there is a solution that doesn't involve milling the chassis? Off the top: paint the frame black and fabricate some air tanks from styrene.

Lucas
« Last Edit: December 04, 2021, 07:08:21 PM by milw12 »

wazzou

  • Crew
  • *
  • Posts: 6635
  • #GoCougs
  • Respect: +1569
Re: Milwaukee Road VO1000 #935
« Reply #4 on: December 04, 2021, 07:21:42 PM »
0
I think the only way would be to mill that area of the frame narrower, if not integral to the strength or motor support and then fabricate new tanks.
Bryan

Member of NPRHA, Modeling Committee Member
http://www.nprha.org/
Member of MRHA


Ed Kapuscinski

  • Global Moderator
  • Crew
  • *
  • Posts: 24079
  • Head Kino
  • Respect: +7961
    • Conrail 1285
Re: Milwaukee Road VO1000 #935
« Reply #5 on: December 06, 2021, 10:56:11 AM »
+1
Beautiful model. I really like the radiator blankets.

milw12

  • Crew
  • *
  • Posts: 372
  • Respect: +319
Re: Milwaukee Road VO1000 #935
« Reply #6 on: December 08, 2021, 06:47:48 PM »
0
Thanks Ed, I've wanted to try the blankets since I saw one of your switchers (Conrail NW2?) with them a few years ago. Finally had a reason to use them and a local friend recently had good results in HO with wire and teabags so thought I'd try it out. It seems to me that blankets and weather windows can really make a model feel like it's working in cold conditions.

milw12

  • Crew
  • *
  • Posts: 372
  • Respect: +319
Re: Milwaukee Road VO1000 #935
« Reply #7 on: December 08, 2021, 07:00:12 PM »
+2
935 at work on my Mason City Iowa shelf layout set in 1961, spotting a car the International Harvester warehouse off of 6th and Delaware:


A work in progress by a long mile, just about everything is a stand in as of now. The VO should be S12 901, ACY boxcar should have the later paint scheme, MTL ART reefer is close but not quite. And the automobiles are way off. I am trying to replicate an image, if I can find it publicly available online I'll edit it in, but no luck yet.

However, the image is on the bottom of page 31 of Jim Boyd's Trackside Around Mason City 1958-1978 with Soph Marty. Even if your interests don't include the locale or the railroads involved (MILW, CGW, MSTL, RI, CNW and the trolley), it's an excellent collection of photos that capture the time frame well, both railroading and the small details of American life at the time.

Lucas

Bryn

  • Crew
  • *
  • Posts: 126
  • Gender: Male
  • Respect: +459
Re: Milwaukee Road VO1000 #935
« Reply #8 on: December 12, 2021, 08:42:58 AM »
+3


As Lucas previously mentions our first idea of using photo etched plates didn't really give the right look for the curved fairings. Here are both Atlas replacement cabs in the UK after repainting with a custom orange mix of Tamiya acrylic paints.

tom mann

  • Administrator
  • Crew
  • *****
  • Posts: 10916
  • Representing The Railwire on The Railwire
  • Respect: +998
    • http://www.chicagoswitching.com
Re: Milwaukee Road VO1000 #935
« Reply #9 on: December 20, 2021, 04:53:37 PM »
+1
Great work.  I would love a fillet-ed version. As I recall, @Chris333 used LifeLike SW fuel tank/air parts to better render that area. 

Chris333

  • Crew
  • *
  • Posts: 18085
  • Respect: +5508
Re: Milwaukee Road VO1000 #935
« Reply #10 on: December 21, 2021, 03:57:54 AM »
0
Pretty sure I had to mill the frame down when I did mine.