Author Topic: The Cable Layer Train Thread  (Read 1415 times)

0 Members and 1 Guest are viewing this topic.

fcnrwy23

  • Crew
  • *
  • Posts: 380
  • Home of the FCN
  • Respect: +511
The Cable Layer Train Thread
« on: August 27, 2017, 04:49:04 PM »
+1
The Cable Layer Train Thread

(The following information is from the "Future Projects, Unfinished thread")
_____________________________________________________________________________
Northern Lines Limited, Cable-Laying (train)
I constructed this beast, from photos that had appeared in Trains and Diesel Era magazines. The original company, Northern Lines Limited had modified a exBN, U30C into a cabling "plow". The conversion kept most of the locomotive from the walkway, down. I believe it was stated, that the fuel tank was "weighted" with water or cement?. They also gave NLLX 5600, a nickname, "Clyde".
In my model, I tried to do the same with the use of a few Kato U30C parts (Trucks and Pilots). The handrails were from Concor's C630 locomotive and the rest of the model was styrene stock.


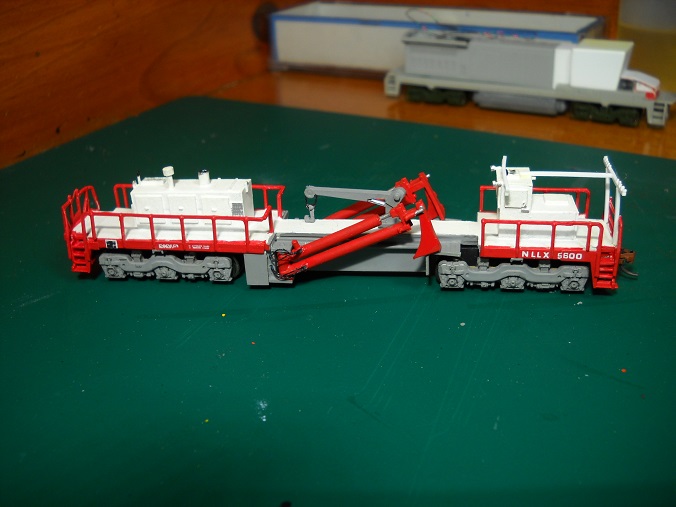
The video is of a Newer, Version of "Clyde".


On the GGX version, I would be adding a "Supply Car"..
So, for now it looks like, "Clyde" will finally get his train!
_______________________________________________________________________________


August 26, 2017

Update of the previous information...
The NLL company went out of business in the early 2000s', when there was a downturn in the business of communication cable laying.  The company was folded into another and all info on the fate of "Clyde" ended there.

The Cable Layer Train...


With the work on the "Plow"car (Clyde) for the CLT, already completed.  I have started on construction of the "Reel" supply cars that make-up the remainder of the train.
   The plan was to use, Atlas 50 foot flatcars modified with the required framework, to support the reels of cable.  After, a few test builds, I decided that the 50 foot length was too small.   So, I rectified that by kitbashing two cars together, to give me a longer, 65 foot car.

I used about 2/3s of each car frame and glued them together.  To strenghten the cars frame at this seam .  I used a full-length piece of the Atlas 50 foot car's metal weight, fastened with GOOP cement and positioned, dead center over the seam.  A second metal weight, that was cut in half was than added, to the outside of the center weight.
This gave the car, a solid backbone and a decent weight.  The original decking, (which I did not order from Atlas) was replaced with a sheet of .040 "V-grooved" styrene stock.


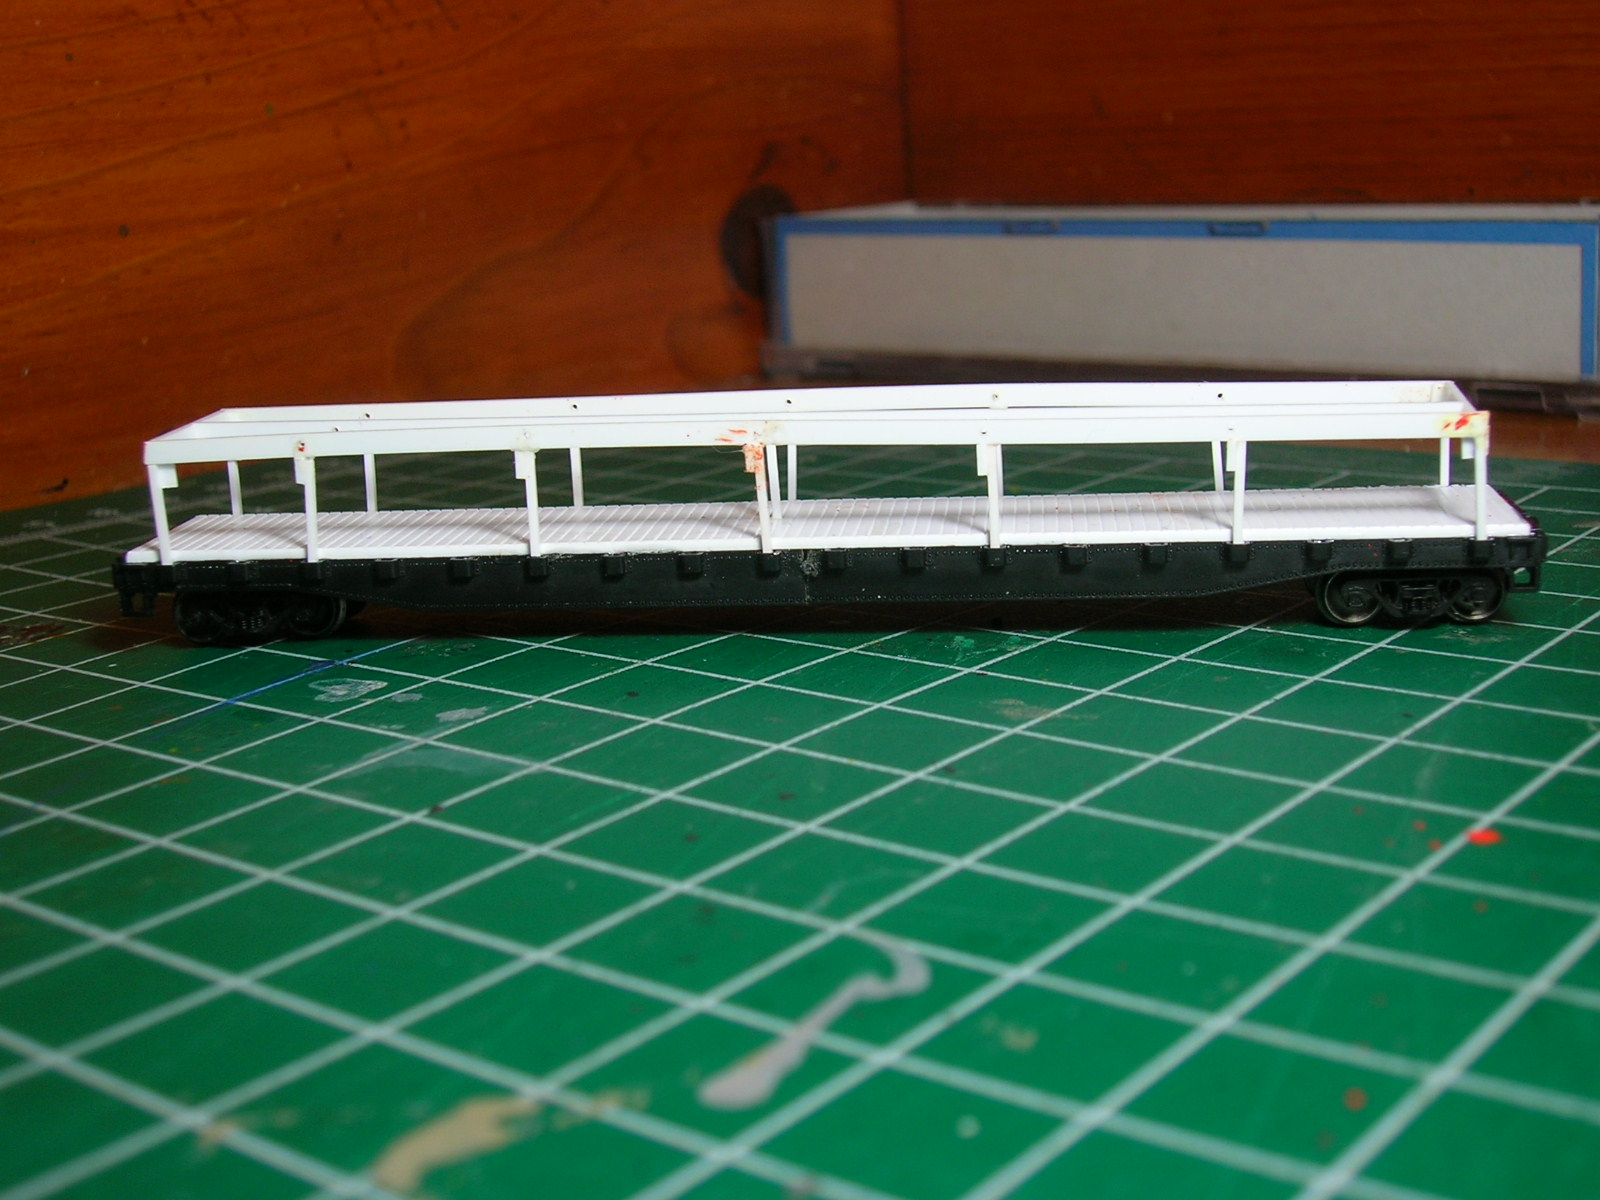
The kitbashed car., with my first attempt at building the Reel Support framework.

The plan was to make the Reels or spools, "Removable" from car for different running options.  To do this, I need to have the mounting pins loose.  But, the wider styrene top frame looks too big.   It has been suggested to me, to build the framework, out of brass stock (.016) and forgo the "removable" part.

I am also, researching the dimensions of the cable "reels".   I have decided to fabricate my own, with "v-grooved" styrene (which looks like decking) for the sides and "tube" stock for the internal spindle of the reels.

Jerry G.
« Last Edit: September 01, 2017, 12:39:37 PM by fcnrwy23 »

orionfield

  • Crew
  • *
  • Posts: 106
  • Gender: Male
  • Respect: +22
    • Out of the Box Models
Re: The Cable Layer Train Thread
« Reply #1 on: August 31, 2017, 08:51:13 PM »
0
Looks Amazing! I love following your work.
CEO of Out of The Box Models. Ask me about Commissioning a model kit!
www.outoftheboxmodels.com

up1950s

  • Crew
  • *
  • Posts: 9682
  • Gender: Male
  • Respect: +2103
Re: The Cable Layer Train Thread
« Reply #2 on: August 31, 2017, 09:46:16 PM »
0
Wow nice going so far . Who owns the cable ? Is this RR only cable ?


Richie Dost

fcnrwy23

  • Crew
  • *
  • Posts: 380
  • Home of the FCN
  • Respect: +511
Re: The Cable Layer Train Thread
« Reply #3 on: September 01, 2017, 12:35:57 PM »
0
Wow nice going so far . Who owns the cable ? Is this RR only cable ?

My understanding,  (please correct if wrong).   Is that they get "Leased" by a Communications company or company doing the work for the former, and than for a project or projects..

The "Cable" is the property of the communication company.

Jerry G.

fcnrwy23

  • Crew
  • *
  • Posts: 380
  • Home of the FCN
  • Respect: +511
Re: The Cable Layer Train Thread
« Reply #4 on: September 01, 2017, 12:41:02 PM »
0
Correction...

I forgot that I forgot to add  :facepalm: the correct code to display the reconstructed "Reel" car...

Jerry G.

fcnrwy23

  • Crew
  • *
  • Posts: 380
  • Home of the FCN
  • Respect: +511
Re: The Cable Layer Train Thread
« Reply #5 on: September 16, 2017, 03:06:22 PM »
0
September 16, 2017

Work has been progressing on a number of fronts, one of these is the creation of the "Reels" for this train.


Sample of the parts that makeup a "Reel"

The Spools are created from styrene dim stock.   The sides are .040 "V-groove" sheet with .050 spacing, to simulate a "wooden" constructed spool.  I have a set of Old punches and a 5/8 diameter hole punched was used for the disc.   The Cores of the spool are 3/8" diameter tube stock, cut down to 1/4" lengths. 
I drilled the center mounting holes, before assembling the sides and core together.

The  Cable

My choice of using DCC wire was the first thing that came to mind.  I have 27 and 30 gauge varieties on-hand.  The different colors available made it that much easier.
I first drilled a mounting hole into the core, near the seam between core and side.  Then, inserted one end of the wire and after, I wand two (2) layers of wire.  I had a finished Reel. (I need to paint the spools, first).

Jerry G.

fcnrwy23

  • Crew
  • *
  • Posts: 380
  • Home of the FCN
  • Respect: +511
Re: The Cable Layer Train Thread
« Reply #6 on: October 07, 2017, 04:22:02 PM »
+2
October 7, 2017

My Cable Layer Train is finally finished.
The plan on using styrene sheet stock for the "spools" and 30 gauge wire for the "Optic Fiber Cable", worked out very well!.

Photo of the complete, train!


A close-up of the Spools of Optic cable on the CLLX 12.


To simulate the Optic Cable loads, I first drilled a micro hole into the "Core" of the spool, near it's junction with one Side. I than, "hooked" the end of the wire and added a dap of ACC cement to hold it in place.  After, I gave this connection a few minutes to hold, I carefully wound the wire once around the core of each spool.  It took about eight revolutions, to completely cover the core of the spool.  I than, added a second dap of ACC to secure the end of the wire.  After this cured, I cut off the excess and I was done!

I just need to paint the coupler assemblies( knuckles/trip pin and pocket) and the project will truly be done and "Clyde" finally gets his' cars !!  :D

With the completion of this project, I am pretty much done with my MOW projects for the time being.   The CWR Train, is on indefinite hold until I can find a suitable, flexible, stand-in for 132 lbs. rail...


Jerry G.