I've been after Bryan at ESM to offer his amazing rolling stock in kit form. He insists that the economics aren't there, and that N scale as a market is pretty focused on RTR. While there's no question that the products he's offering are nothing short of awesome, there are those who balk at the sticker price for the finished goods.
Years ago, Micro Train stopped offering kits, but I recall back in the mid 1980s picking up a three pack of trailer train flats in kit form for the same price they were offering a single built up car. Obviously, the cost of labor in Oregon is different than what one might pay in Bing Bangaloo, but still, one would have to imagine that there would be some savings to the consumer if the product were available in a ziploc bag as opposed to a shiny jewel box.
Anyway, last week I received a box in the mail containing all the parts necessary (save the BLMA trucks) to build an ESM x-58 boxcar. Bryan had some leftover parts including some paint test shots, etchings, and even couplers, and he sent them along to me to fool around with. I know his intention was purely to get some leftover stuff off his desk, but I looked at it as an opportunity to see how big a deal it would be for an average modeler to put one of these outstanding cars together.

Here's the finished product. It's presently riding on Atlas 100 ton trucks with Bachmann's metal 36" wheels. In the photo, it's got 33" plastic wheels, but they proved to be a little wobbly. I plan to get a pair of BLMA trucks next time in the right zip code.
The shell is painted white, it was a sample for either the Lehigh Valley car or a special run car for ESM's 300th anniversary or something. Otherwise, it is undecorated. The underframe came as a complete unit. I'm not sure if it consists of more than one part, but I'm assuming that the fine brake piping and appliances are assembled out of several pieces. Since this was pre-assembled, we'll say I had about a half hour handicap. Otherwise, the shell consists of the basic box, two etched footboards, a small footboard at the brake wheel, the long running board along the top, which includes two small wire grabs, and three plastic parts, the braces at the ends of the running board, and the brake wheel.

For the most part, assembly was pretty straightforward. I found the circular sprue around the brakewheel a tad cumbersome, but I'd blame my dull blade before I complained too loudly. I squeezed a drop or 7 of CA into a beer bottle cap I had handy (imagine that!) and used a small bit of wire as an applicator. This technique was successful at installing all of the etched bits. If anything needs to be altered for this to be a successful kit, though, it would be some sort of guide for ensuring that the walkboard ends up straight and centered. As it is, the walkboard just floats on top of the pads that are cast into the roof, so you have to carefully align it as you're securing it with CA.
Also, the brakewheel is sized a bit small compared to the mounting hole, so it requires glue to be secured. A design that allows this to be press fit would be helpful... an errant splash of plastic solvent could easily spoil the paint should a kit be offered that is factory decorated. The plastic braces for the ends of the walkboards also require glue, but there is a handy ledge cast into the shell that makes it easy to position and secure. I used liquid plastic solvent cement to make those connections.
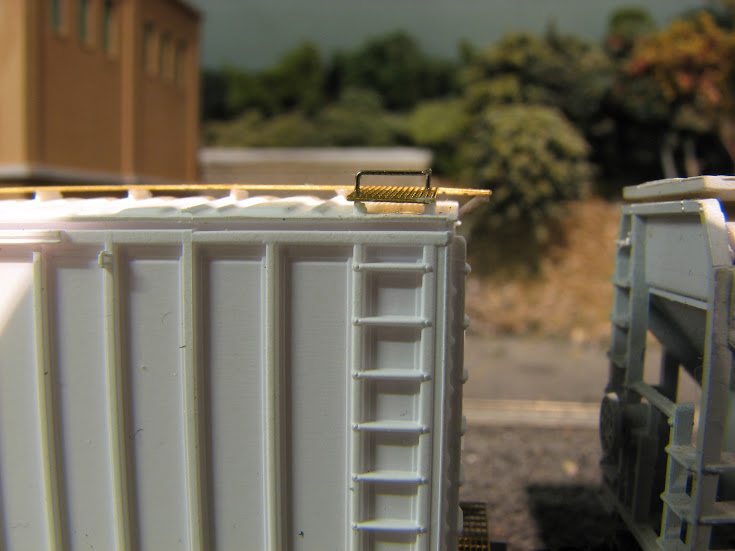
The only part that presented a significant challenge was the wire grabs that need to be inserted into tiny holes etched in the walkway. In retrospect, I would have put these on before I installed the walkboard to the roof, in order to try to get them down a little lower. The length of the legs on the grabs is a little long in my estimation. I'm not sure how they handle these at the factory, nor do I have a factory car to compare it to, so I'll accept it as good enough. Once painted, I'm sure they'll assume a certain level of invisibility.
The whole project, including assembling the ingeniously designed coupler pocket, took about three sides of a Long Play record. (about 50-60 minutes... I was listening to Weather Report "
Heavy Weather" followed by a side of
Venus and Mars by Wings.) I don't think that's an unreasonable block of time to put together a fine looking model like this. With a list price for the RTR version topping $32, I think a kit of this could be quite popular, even if it tips the scales at around $20 - 25. Simplified packaging, minimal labor, and perhaps even reduced shipping, and I'm sure this car would find a market.
Or, maybe it's just me because I'm cheap.
Anyway, I wanted to share the results of my experiment with you, and I look forward to your feedback.
Lee
I'm not sure how I'm going to letter it... I'm thinking I'll work up a design for a Laurel Valley X-58, either that or I'll get some PRR decals, if the right set is available.


