The basis for my modular layout "standards" started as Bend Track standards. However, I didn't like the narrowness and the photos of Bend Track modules being run with no skyboard, although a skyboard is recommended.
Since I was not planning on buckling up with any Bend Track clubs (there are none within at least a thousand miles of where I live) and since the whole IDEA behind developing my own modular standards, both innovating my own ideas and borrowing ideas from other modular groups, was to offer myself the opportunity to build a large layout one module (or section) at a time, then putting it together when I finally acquire the space, and/or setting it up at two or three local shows.
Having learned the hard way that the maximum length I am willing to transport is 6', that measurement became the standard module length.
Since one of the main advantages of N-scale over any of the larger scales is N-scale's Scenery-to-Track-Ratio (STTR), I debated for a while about how much scenery should be "standard" from the skyboard to the edge of the front fascia, and finally decided since I'm building big scenes for little trains, I'd make the width from the absolute back of the 2x2 skyboard supports to the front edge of the fascia exactly 36". Although I like the idea of running on either side of a skyboard, I don't like the idea of doing that with a single module and a 6'x6' square module would be unmanagable, so each of my sections is comprised of two 3'X6' modules positioned back to back, with a double-sided skyboard running down the back of each of them.
These were designed to be portable, so I designed easy-to-build, but sturdy benchwork comprised of premium pine L-girders, 3/4" module ends, flowing front fascias comprised of two layers of 1/8" tempered Masonite, removable skyboards, and lightweight but sturdy integral folding legs that fold up into the space between the two L-girders. with removable, but standard braces made from lattice material.
Roadbed is not build on a table-top, but is comprised of laminated Masonite subroadbed held at the correct height by premium pine risers attached to various sized crossmembers extending across the tops of both L-girders. Yards and large industrial areas use 3/4" plywood "plates" as subroadbed.
My standard railheight to floor measurement was determined after a couple of days my son and I did experimenting with different heights. We looked (closely and far away), put cars on the track, took them off, watched trains go by, re-railed cars and engines that had derailed and listened to our sound-equipped DCC engines. We also got under the modules to see how easy or difficult it was to work on them and troubleshoot. The "perfect" height for us was 52". He's 5' 10" tall and I'm 6' even. He was 23 and I was 61, and it made a huge difference in the way we ran and looked at our trains and scenery.
We added "glides" to the bottom of the folding legs that gave us 3" of up/down height adjustment.
Several of my local train buddies decided to join in the fun, and one of them constructed 24' of modules that met the design parameters enabling him to buckle up to my 36' of modules. Both of us had incorporated several non-standard modules into our setups, so there were two "transition modules", one 6' long, the other 2' long that allowed us to buckle up and run with contiguous scenery, and at the same time, these transition modules also brought our ends into compliance with my modular standards.
So far, we've attended two shows and have been a hit with serious model railroaders and kids who are tall enough to appreciate the prototype scenery we model. We have two platforms for short kids to stand on to watch trains, but our portable layout is specifically built for seasoned model railroaders to appreciate. The kids can go look at the Lego display, the Ntrak setup and any other setups that cater to them.
We're running double track mainlines, code 55 ME flex, with all hand-built turnouts, with branchlines and industries in handlaid code 40 PCB track. It's DCC only, with one DC lashup allowed (at owner's risk) on 000. My partner-in-crime runs Rail Lynx, which uses IR to control his engines and it loves DCC power running on the tracks, but he is thinking seriously about converting to DCC because of its advanced features and sound.
I have standards for single-track setups also, as well as what I'm calling "branchline" modules, which are narrower.
The standards call for precise location of the rails on module ends, so no joiner tracks are necessary. Electrical standards are derived from Ntrak's DCC standards and 22 ga. feeders are required on each section of rail. Track is laid on Midwest Cork Products roadbed.
Here's a couple of photos of our setup at the Evanston Roundhouse Festival in 2012:
Photo (1): My side, which is comprised of LDE's from Weber and Echo Canyons featuring Echo Yard, Park City Branchline Yard, Echo Curve, Emory Center Siding and Taggarts: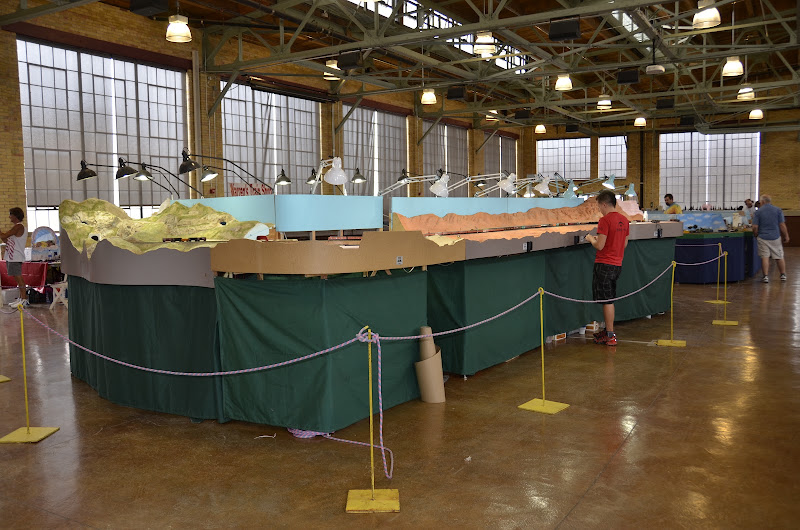 Photo (2): Gregg's side which is comprised of generic D&RGW scenery:
Here are some photos illustrating the benchwork, which looks heavy, but isn't.
Photo (3): Emory Center Siding (not installed at the photo date) and 2' transition module: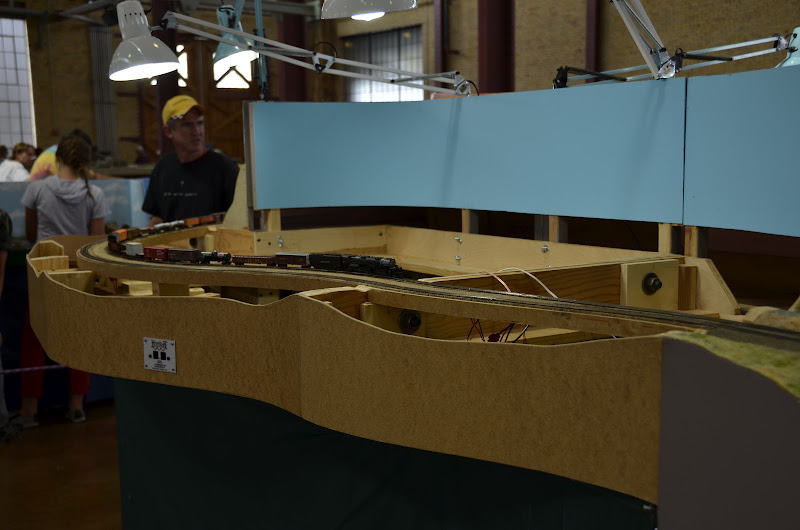 Photo (4): Taggarts Transition Module before subroadbed & before fascia contour has been cut, showing Integral Folding Legs & Lightweight Construction:
 Illustration (1): Sketchup drawing showing "standard" benchwork with a few dimenensions. Folding legs fit between the two L-girders, & stack when folded up:
Although I have about 3/4 of the total layout designed (benchwork included) to fit in a 40' X 40' space, it's nice to be able to set up and work on my LDE's which fit together very nicely at the "standard" ends, as well as each LDE fitting together at their custom ends.
Here's a JPG conversion of one possibility for my finished layout in a 30' X 30' space, which fits the maximum layout size allowed in the Hostlers Model Railroad Club's show every March. As you can see, I haven't worked the plan for the Riverdale/Ogden LDE yet. I'm getting my references together and will be planning that portion of the layout sometime early next year.
Illustration (2): JPG conversion of Cadrail file showing layout's sectional construction: Illustration (3): This is a JPG conversion of a Cadrail file that shows five LDE's set up in what would normally be my media room. The LDE's are (1) Wilhemina Pass, (2) Devils Slide/Ideal Concrete, (3) Emory/Devils Slide Center Siding, (4) Echo Curve and Cliffs, (5) Echo: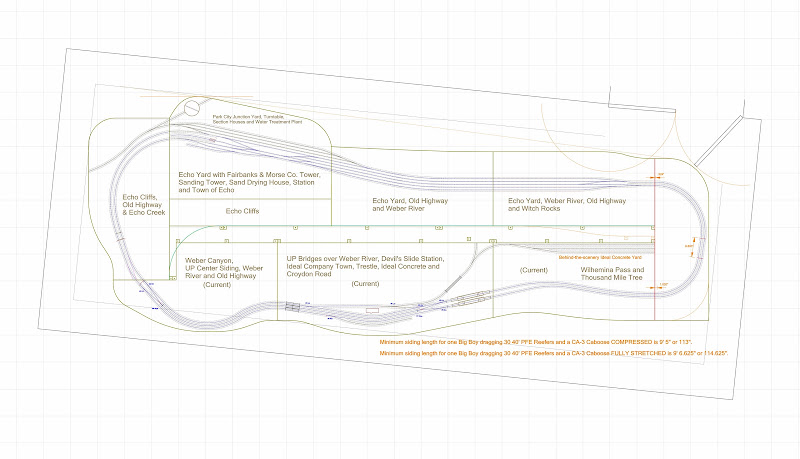
This particular setup is an island because Echo Curve doesn't allow it to be set up along the walls. Perhaps another configuration will allow me to make better use of my space if I am still at this residence for a few more years.
Anyway, this is the way I've done it. Maybe you'll get some pointers for yours.
EDIT: I had a helluva time attempting to post photos on this post for some reason. When I initially loaded the photos, I made sure the layout diagrams were original size, but coming back to my post an hour or so later, they had disappeared. Now, they won't display at original resolution, and after five tries, I'm giving up.

