Finaly I could start with the "how to"...
I don't have much pictures about the proces of covering this diorama. But I'll try to write it down as correct as possible.

chapter one:
The shopping list:
I used these kind of grassfibres/flock:
0,5- 1mm grass flock , light and dark brown( Mininatur/Silflor
2mm grass flock: kind of “straw”/”dried”/beige gras colour( MiniNatur/Silflor , Model scene or NOCH
4mm grass-flock 4,5 mm - Late Summer ( Model scene)
4mm grass-flock beige ( Model scene, MiniNatur/Silflor or NOCH)
6,5mm grass- flock beige and “late summer” ( Model scene )
12 mm grass -flock : straw ( NOCH )
a pipette or a eyedropper.
White glue and Bookbindingglue to attach the fibres ,small roots etc etc.
Some acryl paint: I mostly use just 3 colours: black, buff and ocre and mix them in the right colour
a static grass applicator-35kV to add the grass/flock on the surface Also:
Fine turf from Woodland scenics: earth , burnt, and yellow grass.( kitchensieve)
Some – dry and prepared- small roots and twigs from Buxus sempervirens and a little bit of fine Sand.( garden(s) )and sieved gravel
I started with:
Covering the rough surface of the complete diorama with a layer of real eart/dust, some sand and very small little sieved gravel. Glued with (deluted) whiteglue in which I added some darkbrownblackish acrylpaint.
I try to avoid a flat smooth surface! Just like nature( well mostly ….)
Let it dry overnight.
To glue the flock/fibres I use- approx.- a mix of 1/3 white glue and 2/3 bookbindingglue (it makes the glue not so “shiny”/glossy as if using only whiteglue.)
The whole trick is
not to glue large areas but small tiny spotts / dots of glue.
To accomplish this I use :
A rough course sponge or even better: a piece of a fish tank filter sponge. This kind of filter sponge has wider “holes” comparing to a normal sponge. With this piece of filtersponge you can splash/generate irregular many/tiny small dots of the mixed glue .
I just dip the sponge in a small flat container filled with the mixed glue and squeeze it a little bit before the next movements: just keep the piece of sponge or filter gently between your fingers and “throw” the sponge- (still keep it between your fingertips!) -with glue with a fast quick movement over the place you want the dots/spots of glue. It needs some exercise to get the best results….( à la Jackson Pollock)
A long hair brush can be used too to splashe /dabble the glue irregular on the surface of the diorama.
It – also-needs some excersise to get the right results!

Keep the static grass applic. ready for use when you add the glue.
Btw: cover only max 30 x30 cm( =one foot x one foot) at a time.
Add the groundpine of the applic. and hold it just an inch above the surface with the small dots of glue.
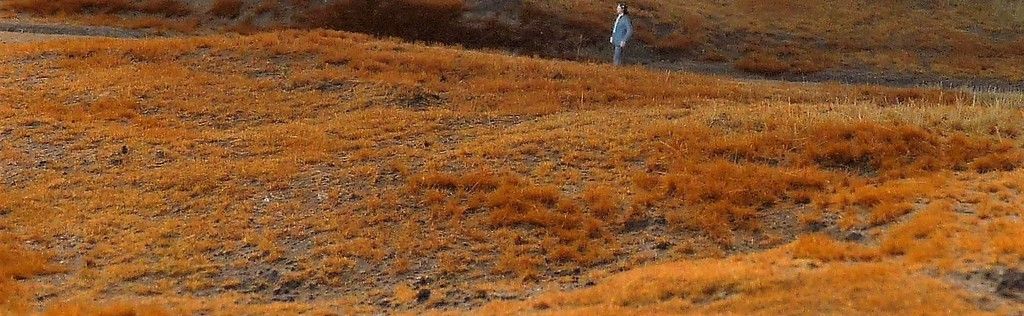
On the picture - in the front-you can see clearly the small “dots”with the fibers in/on it. Also the sand and sieved gravel between the grassfibres.
I used , first the 1 mm fibres and 2 hours later the second layer of 2 mm – both light and dark brown fibres.
to be continued....
Jos


